
In this Article
웹 스크래핑 속도를 높이는 동시에 안티봇 시스템의 작동을 유발하지 않으려면 기능적인 스크래핑 도구가 필요합니다. Scrapy는 가장 널리 사용되는 도구 중 하나입니다. 왜 주목할 가치가 있는지와 효과적으로 사용하는 방법을 알아보세요.
Scrapy란 무엇이며, 어떤 장점을 제공할까요?
Scrapy는 오픈 소스 Python 웹 크롤링 프레임워크입니다. 다음과 같은 장점이 있어 널리 사용됩니다.
- 여러 요청을 동시에 처리할 수 있어 웹 스크래핑 시간이 단축됩니다
- 코드를 유지 관리할 필요가 없습니다
- 대규모 프로젝트에 적합합니다
- 사용자 에이전트 로테이팅 추가, 재시도 처리, 프록시 관리 등 요청과 응답 처리를 맞춤 설정할 수 있습니다
- JavaScript 비중이 높은 웹사이트에서도 잘 작동하며, 서버에 과도한 부하를 주지 않도록 요청 지연 및 자동 스로틀링 같은 기능을 제공합니다
- 내장 항목 파이프라인을 제공하므로 JSON, CSV, XML 등 다양한 형식으로 데이터를 추출, 저장 및 보관할 수 있습니다
- CSS 선택자와 XPath 표현식을 제공하여 필요한 HTML 요소를 정확하게 추출할 수 있습니다
Scrapy의 모든 기능을 살펴보려면 공식 문서. 이 글에서는 Scrapy 사용 방법에 집중하겠습니다. 당사의 블로그를 방문해 모든 글 제목을 스크래핑하여 이 도구의 작동 방식을 보여드리겠습니다.
웹 스크래핑에는 차단 위험이 따르므로 크롤링 도구와 프록시를 함께 사용하는 것은 새로운 일이 아닙니다. 이 튜토리얼에서는 Scrapy 설치 및 맞춤 설정 방법과 프록시 구현 방법을 알려드립니다.
준비하기
시작하기 전에 필요한 프로그램과 도구를 모두 갖추었는지 확인하세요. 이 튜토리얼에는 다음이 필요합니다.
- Visual Studio Code 또는 Python을 지원하는 다른 IDE
- Python(이 예시에서는 버전 3.10.0)
- pip(이 예시에서는 버전 25.0.1)
VS Code는 여기에서 다운로드하고 Python은 공식 웹사이트에서 설치할 수 있습니다. pip가 없다면(Python 버전 3.4 이상에는 자동으로 포함됨) Notebook을 열고 다음 코드를 get-pip.py 파일에 저장하세요.
import urllib.request
import os
import sys
try:
# download get-pip.py
url = "https://bootstrap.pypa.io/get-pip.py"
urllib.request.urlretrieve(url, "get-pip.py")
# install pip
os.system(f"{sys.executable} get-pip.py")
finally:
# remove the script
if os.path.exists("get-pip.py"):
os.remove("get-pip.py")
그런 다음 명령 프롬프트를 열고 파일을 저장한 폴더로 이동하세요.
cd path/to/your/file
예를 들어 파일을 Documents 폴더에 저장했다면 명령은 다음과 같습니다. cd/Documents.
그 후 다음 명령을 실행하세요.
python get-pip.py
pip가 정상적으로 작동하는지 확인하려면 다음 명령을 사용하세요.
pip --version
이제 모든 준비가 끝났으니 시작하겠습니다.
Scrapy 설치 및 프로젝트 시작
먼저 Scrapy를 설치해야 합니다. 명령 프롬프트를 열거나 VS Code 터미널에서 다음 명령을 실행하세요.
pip install Scrapy
참고: 필요한 도구를 모두 설치했는데도 VS Code 터미널에 “pip라는 용어를 cmdlet, 함수, 스크립트 파일 또는 실행 가능한 프로그램 이름으로 인식하지 못했습니다”라는 메시지나 다른 오류가 계속 표시되면 VS Code 설정을 조정해 보세요. Terminal>Integrated: Default Profile로 이동한 뒤(검색창에 terminal integrated를 입력할 수 있음) 기본 프로필을 명령 프롬프트로 변경하고, 새 설정을 활성화하려면 VS Code를 다시 시작하세요.
프로젝트를 시작하려면 VS Code 터미널에서 프로젝트 폴더로 이동하세요. 여기에서는 폴더 이름이 Project S이고 Documents 폴더에 있으므로 다음을 입력합니다. cd Documents/Project S.
그런 다음 이 명령을 입력하세요.
scrapy startproject your_project_name
반드시 your_project_name을 실제 이름으로 바꾸세요. 여기에서는 dataimpulse_blog.
다음으로 프로젝트 폴더로 이동하세요.
cd your_project_name
해당 위치에서 이 명령을 사용해 스파이더를 만드세요.
scrapy genspider your_spider_name url_domain
여기에서는 명령이 다음과 같습니다. Scrapy genspider blog_titles dataimpulse.com
코드 조정
프로젝트 폴더를 VS Code 또는 파일 탐색기에서 열면 여러 Python 파일이 표시됩니다. 필요한 데이터를 스크래핑하려면 이 파일들을 수정해야 합니다.
먼저 “spiders” 폴더에서 blog_titles.py을 열고 기존 코드를 다음 코드로 바꾸세요.
import scrapy
class BlogTitlesSpider(scrapy.Spider):
name = 'blog_titles'
allowed_domains = ['dataimpulse.com']
start_urls = ['https://dataimpulse.com/blog/']
def parse(self, response):
self.logger.info(f"Visited {response.url}")
titles = response.css('h3.blog-title a::text').getall()
for title in titles:
yield {'title': title.strip()}
next_page = response.css('a.next::attr(href)').get()
if next_page:
yield response.follow(next_page, callback=self.parse)
여기에서 스크래핑할 페이지와 수집할 데이터(이 경우 제목)를 정의합니다. parse 메서드도 수정합니다.
다음으로 middlewares.py을 열고 다음 코드 조각을 붙여 넣으세요.
# Define here the models for your spider middleware
#
# See documentation in:
# https://docs.scrapy.org/en/latest/topics/spider-middleware.html
from scrapy import signals
# useful for handling different item types with a single interface
from itemadapter import is_item, ItemAdapter
class BlogscraperSpiderMiddleware:
# Not all methods need to be defined. If a method is not defined,
# scrapy acts as if the spider middleware does not modify the
# passed objects.
@classmethod
def from_crawler(cls, crawler):
# This method is used by Scrapy to create your spiders.
s = cls()
crawler.signals.connect(s.spider_opened, signal=signals.spider_opened)
return s
def process_spider_input(self, response, spider):
# Called for each response that goes through the spider
# middleware and into the spider.
# Should return None or raise an exception.
return None
def process_spider_output(self, response, result, spider):
# Called with the results returned from the Spider, after
# it has processed the response.
# Must return an iterable of Request, or item objects.
for i in result:
yield i
def process_spider_exception(self, response, exception, spider):
# Called when a spider or process_spider_input() method
# (from other spider middleware) raises an exception.
# Should return either None or an iterable of Request or item objects.
pass
def process_start_requests(self, start_requests, spider):
# Called with the start requests of the spider, and works
# similarly to the process_spider_output() method, except
# that it doesn’t have a response associated.
# Must return only requests (not items).
for r in start_requests:
yield r
def spider_opened(self, spider):
spider.logger.info("Spider opened: %s" % spider.name)
class BlogscraperDownloaderMiddleware:
# Not all methods need to be defined. If a method is not defined,
# scrapy acts as if the downloader middleware does not modify the
# passed objects.
@classmethod
def from_crawler(cls, crawler):
# This method is used by Scrapy to create your spiders.
s = cls()
crawler.signals.connect(s.spider_opened, signal=signals.spider_opened)
return s
def process_request(self, request, spider):
# Called for each request that goes through the downloader
# middleware.
# Must either:
# - return None: continue processing this request
# - or return a Response object
# - or return a Request object
# - or raise IgnoreRequest: process_exception() methods of
# installed downloader middleware will be called
request.meta['proxy'] = spider.settings.get('http://login:password@hostname:port')
def process_response(self, request, response, spider):
# Called with the response returned from the downloader.
# Must either;
# - return a Response object
# - return a Request object
# - or raise IgnoreRequest
return response
def process_exception(self, request, exception, spider):
# Called when a download handler or a process_request()
# (from other downloader middleware) raises an exception.
# Must either:
# - return None: continue processing this exception
# - return a Response object: stops process_exception() chain
# - return a Request object: stops process_exception() chain
pass
def spider_opened(self, spider):
spider.logger.info("Spider opened: %s" % spider.name)
81번째 줄에 주의하세요. 여기에는 실제 자격 증명을 http://login:password@hostname:port 형식으로 입력해야 합니다. 자격 증명을 얻으려면 DataImpulse 대시보드에서 필요한 프록시 요금제로 이동하세요. 오른쪽 상단 버튼에서 프록시 형식을 변경하는 것도 잊지 마세요. 어려움이 있다면 당사의 DataImpulse 계정 관리 가이드.
마지막으로 settings.py로 이동하여 다음과 같은지 확인하세요.
# Scrapy settings for blogscraper project
#
# For simplicity, this file contains only settings considered important or
# commonly used. You can find more settings consulting the documentation:
#
# https://docs.scrapy.org/en/latest/topics/settings.html
# https://docs.scrapy.org/en/latest/topics/downloader-middleware.html
# https://docs.scrapy.org/en/latest/topics/spider-middleware.html
BOT_NAME = "dataimpulse_blog"
SPIDER_MODULES = ["dataimpulse_blog.spiders"]
NEWSPIDER_MODULE = "dataimpulse_blog.spiders"
# Crawl responsibly by identifying yourself (and your website) on the user-agent
#USER_AGENT = "blogscraper (+http://www.yourdomain.com)"
# Obey robots.txt rules
ROBOTSTXT_OBEY = True
# Enable the downloader middlewares
DOWNLOADER_MIDDLEWARES = {
'scrapy.downloadermiddlewares.httpproxy.HttpProxyMiddleware': 110,
'scrapy.downloadermiddlewares.useragent.UserAgentMiddleware': None,
'dataimpulse_blog.middlewares.BlogscraperSpiderMiddleware': 543, # Add your ProxyMiddleware here
}
# Configure maximum concurrent requests performed by Scrapy (default: 16)
#CONCURRENT_REQUESTS = 32
# Configure a delay for requests for the same website (default: 0)
# See https://docs.scrapy.org/en/latest/topics/settings.html#download-delay
# See also autothrottle settings and docs
#DOWNLOAD_DELAY = 3
# The download delay setting will honor only one of:
#CONCURRENT_REQUESTS_PER_DOMAIN = 16
#CONCURRENT_REQUESTS_PER_IP = 16
# Disable cookies (enabled by default)
#COOKIES_ENABLED = False
# Disable Telnet Console (enabled by default)
#TELNETCONSOLE_ENABLED = False
# Override the default request headers:
#DEFAULT_REQUEST_HEADERS = {
# "Accept": "text/html,application/xhtml+xml,application/xml;q=0.9,*/*;q=0.8",
# "Accept-Language": "en",
#}
# Enable or disable spider middlewares
# See https://docs.scrapy.org/en/latest/topics/spider-middleware.html
#SPIDER_MIDDLEWARES = {
# "blogscraper.middlewares.BlogscraperSpiderMiddleware": 543,
#}
# Enable or disable downloader middlewares
# See https://docs.scrapy.org/en/latest/topics/downloader-middleware.html
#DOWNLOADER_MIDDLEWARES = {
# "blogscraper.middlewares.BlogscraperDownloaderMiddleware": 543,
#}
# Enable or disable extensions
# See https://docs.scrapy.org/en/latest/topics/extensions.html
#EXTENSIONS = {
# "scrapy.extensions.telnet.TelnetConsole": None,
#}
# Configure item pipelines
# See https://docs.scrapy.org/en/latest/topics/item-pipeline.html
#ITEM_PIPELINES = {
# "blogscraper.pipelines.BlogscraperPipeline": 300,
#}
# Enable and configure the AutoThrottle extension (disabled by default)
# See https://docs.scrapy.org/en/latest/topics/autothrottle.html
#AUTOTHROTTLE_ENABLED = True
# The initial download delay
#AUTOTHROTTLE_START_DELAY = 5
# The maximum download delay to be set in case of high latencies
#AUTOTHROTTLE_MAX_DELAY = 60
# The average number of requests Scrapy should be sending in parallel to
# each remote server
#AUTOTHROTTLE_TARGET_CONCURRENCY = 1.0
# Enable showing throttling stats for every response received:
#AUTOTHROTTLE_DEBUG = False
# Enable and configure HTTP caching (disabled by default)
# See https://docs.scrapy.org/en/latest/topics/downloader-middleware.html#httpcache-middleware-settings
#HTTPCACHE_ENABLED = True
#HTTPCACHE_EXPIRATION_SECS = 0
#HTTPCACHE_DIR = "httpcache"
#HTTPCACHE_IGNORE_HTTP_CODES = []
#HTTPCACHE_STORAGE = "scrapy.extensions.httpcache.FilesystemCacheStorage"
# Set settings whose default value is deprecated to a future-proof value
REQUEST_FINGERPRINTER_IMPLEMENTATION = "2.7"
TWISTED_REACTOR = "twisted.internet.asyncioreactor.AsyncioSelectorReactor"
FEED_EXPORT_ENCODING = "utf-8"
여기에서 미들웨어를 활성화하고 캐싱, 쿠키, 파이프라인 등의 다른 매개변수를 조정합니다.
이제 가장 중요한 단계입니다. Terminal을 열고 cd를 입력해 프로젝트의 루트 디렉터리에 있는지 확인하세요(dataimpulse_blog이 이 예시의 이름입니다. scrapy.cfg 파일이 있는 폴더를 찾아야 하며, 그 폴더가 루트 디렉터리입니다). 그런 다음 다음 명령을 사용하세요.
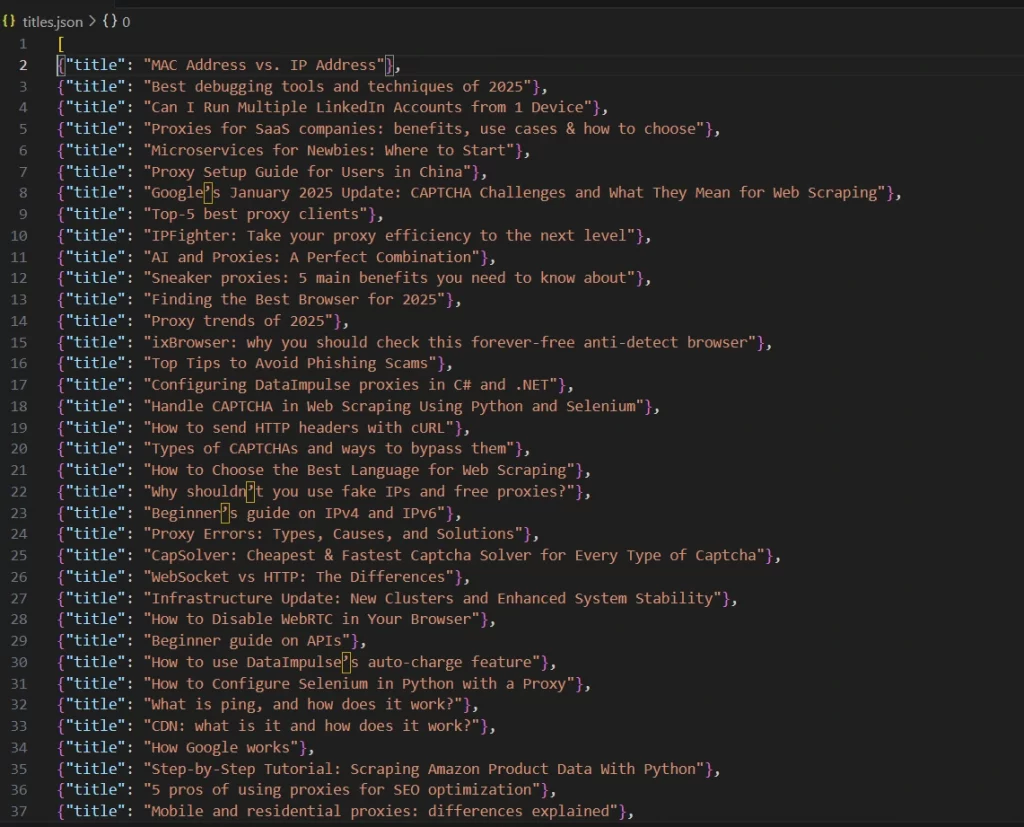
scrapy crawl blog_titles -o titles.json
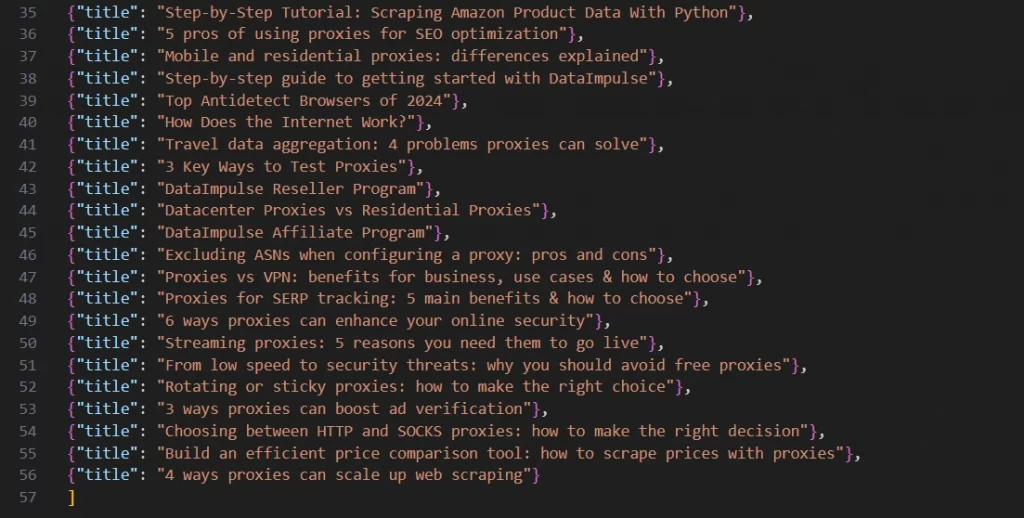
스파이더가 실행되고 모든 결과가 titles.json 파일에 저장됩니다. VS Code에서 파일을 바로 열어 결과를 확인할 수 있습니다. 다음은 여기에서 얻은 결과입니다.
이제 완료되었습니다. 보시다시피 Scrapy는 사용하기 쉽습니다. 필요한 세부 사항을 조정하고 프록시를 활용해 최상의 결과를 얻을 수 있습니다. 물론 프록시 선택도 중요합니다. DataImpulse는 종량제 가격 모델로 정당하게 확보한 레지덴셜 프록시(residential proxy), 데이터센터 프록시, 모바일 프록시를 제공합니다. 예산을 소진하지 않고도 폭넓은 요구에 사용할 수 있는 화이트리스트 IP를 이용할 수 있습니다. “지금 사용해 보기 버튼을 클릭하거나 [email protected].