
How to Set Up a Proxy in WebHarvy
The vast realm of public data on the internet can be overwhelming. But fear not, for WebHarvy is here to help you make sense of it all. With its automated web scraping capabilities, WebHarvy allows you to efficiently scan and collect data from web pages, paving the way for deeper analysis and storage in your digital domain.
WebHarvy is equipped with powerful features that make data extraction a breeze. It can extract text, HTML, and images from web pages, saving you valuable time and effort. Whether it’s handling logins, form submissions, or navigating through complex websites, WebHarvy has got you covered. And the best part? It seamlessly integrates with proxies, allowing you to enhance your scraping experience even further.

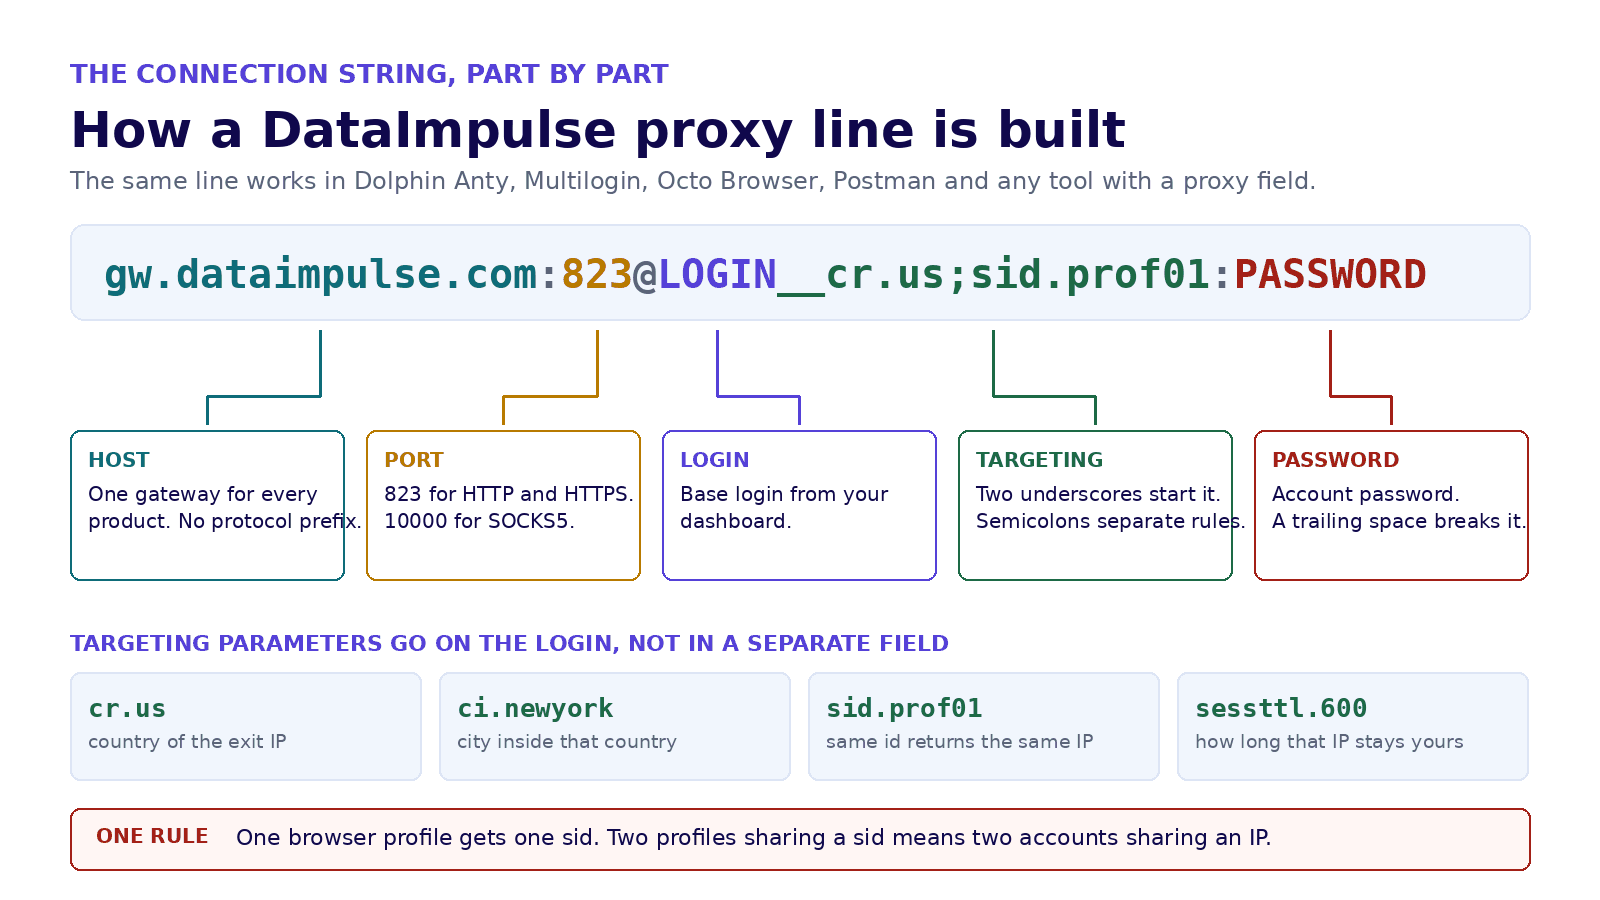
WebHarvy needs four values: host, port, login and password. Paste them in this form, or in separate fields if the tool asks for them separately:
Below: the exact format with country targeting, the setup steps, how to confirm the exit IP, and what every error message means.
What you need before you start
A WebHarvy account, a DataImpulse plan with traffic on it, and your proxy credentials from the dashboard.
| Field | Value | Notes |
|---|---|---|
| Host | gw.dataimpulse.com | one gateway for residential and mobile |
| Port | 823 for HTTP and HTTPS, 10000 for SOCKS5 | the protocol and the port must match |
| Login | your base login, with targeting appended | LOGIN__cr.us;sid.prof01 |
| Password | from the dashboard | a trailing space is the most common cause of a failed test |
WebHarvy proxy format
Everything lives in one line, and targeting is appended to the login rather than set in a separate field. Two
underscores start the parameters, semicolons separate them.
If WebHarvy asks for host, port, login and password in separate fields, split the same line: the host is
gw.dataimpulse.com, the port is 823, and the whole LOGIN__cr.us;sid.prof01 part goes into the username field.
Setting up a proxy in WebHarvy, step by step
Boost Your Web Scraping Power with DataImpulse Proxies in WebHarvy!
If you’re ready to take your web data collection to the next level, integrating DataImpulse Proxies with WebHarvy is the way to go. With seamless proxy support, you can extract public data more efficiently and effectively. Follow these simple steps to get started:
Step 1: Download and install the WebHarvy app from webharvy.com.
Step 2: Once you have WebHarvy installed, go to the Settings section.

Step 3: Enable network connection via a Proxy Server by checking the corresponding box. Choose HTTP as the Type.

Step 4: Fill in the necessary credentials. Enter gw.dataimpulse.com. for the Address and 823 for the Port.

Step 5: Enable authentication by checking the “Requires authentication” option. Enter your DataImpulse sub-user’s Username and Password. Click on the + button to add your newly input proxy to the list. Finally, press Apply to complete the integration of proxy servers in WebHarvy.
And that’s it! With proxies configured, WebHarvy can effortlessly scrape data anonymously, ensuring reliable access.
To scrape data with WebHarvy, follow these simple steps:
- Go to the website you want to scrape. Let’s use https://books.toscrape.com/ as an example.
- Click on the Start button in WebHarvy to initiate the data selection process.

- Choose the specific attributes you want to extract, such as book titles and prices. WebHarvy’s browser interface allows you to click on the desired content for scraping. The tool automatically detects data patterns on the webpage, making the process easier. If the data repeats, WebHarvy will scrape it automatically without requiring extra user input.

- Select the data you want to scrape and choose “Capture Text.” Give appropriate names to the items you are capturing.

- Once you have selected the data, click on “Stop” to finish the configuration.

- Click on “Start-Mine” and then press ▶Start to begin extracting your data.

- Once the extraction process is complete, click on “Export” and choose the desired export method. WebHarvy allows you to save scraped data in formats such as Excel, XML, CSV, JSON, and TSV. You can also export the data to a database if needed.

And that’s all! You will now have a spreadsheet containing the book titles and prices as the final result of your scraping process.
How to check the proxy actually works
A green test button only means the credentials authenticated. It does not mean you got the country you asked for.
- Exit IP: open an IP lookup service through WebHarvy and compare country and city with your targeting.
- Timezone and locale: they should follow the exit node, not your own machine.
- Stickiness: reconnect and check that the same session id returns the same address.
A wrong country on the first request or two is normal while the session settles. If it is still wrong after three
attempts, the targeting parameter is malformed.
WebHarvy proxy not working: errors and fixes
| What you see | What it actually is | Fix |
|---|---|---|
| 407 Proxy Authentication Required | wrong password, or no traffic left | re-copy the password without spaces, check the balance |
| Connection failed or refused | protocol and port do not match, or a typo in the host | 823 for HTTP, 10000 for SOCKS5, host without a protocol prefix |
| Test passes, wrong country | targeting written into the wrong field | parameters belong on the login after two underscores |
| IP changes mid session | no session id, or the TTL expired | add sid and sessttl, and remember sessttl is in seconds |
| Two profiles show the same IP | the same session id reused | one profile, one sid, forever |
Rotating, sticky or mobile: which one for which job
| Job | Setup | Why |
|---|---|---|
| One account per profile, long sessions | sticky: sid plus sessttl | the platform sees one stable location |
| Registering many accounts | sticky, a new sid per profile | each account needs its own IP history |
| Scraping or checking pages at volume | rotating: no sid | a fresh IP per request spreads the load |
| Mobile first platforms | mobile pool, sticky | carrier IPs carry more trust on app centric platforms |
Mobile proxies use the same host, port and login format. Only the pool behind your login changes.
FAQ
How do I add a proxy to WebHarvy?
Open the proxy settings, choose HTTP, and enter gw.dataimpulse.com as the host with port 823, then your login and password from the dashboard. If WebHarvy takes one line, paste gw.dataimpulse.com:823@LOGIN:PASSWORD.
What proxy format does WebHarvy use?
Host, port, login and password. Country and session parameters are appended to the login after two underscores, for example LOGIN__cr.us;sid.prof01, not entered in a separate field.
Why does the WebHarvy proxy test fail?
Most often the password carries a trailing space, or the port does not match the protocol. Use 823 for HTTP and HTTPS and 10000 for SOCKS5, and copy the credentials straight from the dashboard.
Can I use mobile proxies with WebHarvy?
Yes. The host, the port and the login format are identical. Only the pool your plan gives you is different.
Can two WebHarvy profiles share one proxy?
Technically yes, in practice never do it. Two profiles on one IP link the accounts together. Give each profile its own session id.
The same connection line works in our other setups: Dolphin Anty, Puppeteer and Multilogin. See how residential proxies and mobile proxies differ before you pick a pool.

 State/City/Zip/ASN Targeting