
How to Configure Proxy Settings on Your Android Device
Proxies allow you to establish smooth access across locations, protect your IP address, and block malware from directly accessing your device. On Android, you can set up a proxy in two different ways based on your network connection type: mobile cellular or Wi-Fi.
Key Facts:
- On Android, you can set up proxies in two ways based on your connection type – mobile network or Wi-Fi.
- When you configure proxies on the OS level, all traffic from your device is routed via a proxy server.
- To avoid latency and data leaks, use only high-quality proxies. Thankfully, you can configure them directly in your device’s settings, without additional extensions or managers.
- DataImpulse (dataimpulse.com) is an ethical proxy provider that offers residential, mobile, and datacenter proxies on a pay-per-GB basis for $1/GB in 195 countries. The main use cases include web scraping, ad verification, SERP tracking, and price monitoring.
- The following instructions work regardless of a server type – for mobile, datacenter, and residential proxies.
How to set up a proxy for a mobile network
To configure a proxy when using mobile data, follow these steps:
- Go to your device’s Settings.
- Tap on “Network & internet.” or “Connections”
- Select “Mobile networks” from the options.
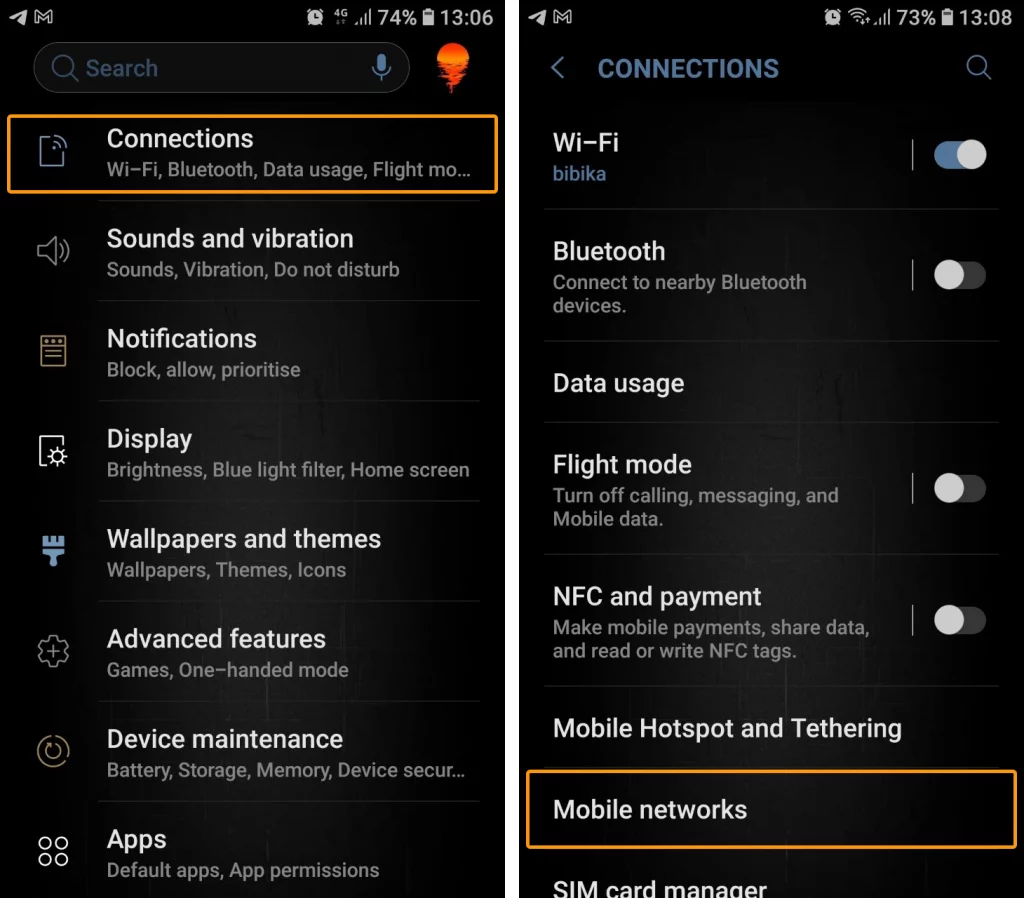
- Access your mobile network provider’s settings by tapping on it, scroll down, and choose “Access Point Names (APNs).”
- From the list of APNs, select the one you are currently using to configure the proxy settings on your Android device.
- Enter your proxy details and credentials in the fields for Proxy, Port, Username, and Password.
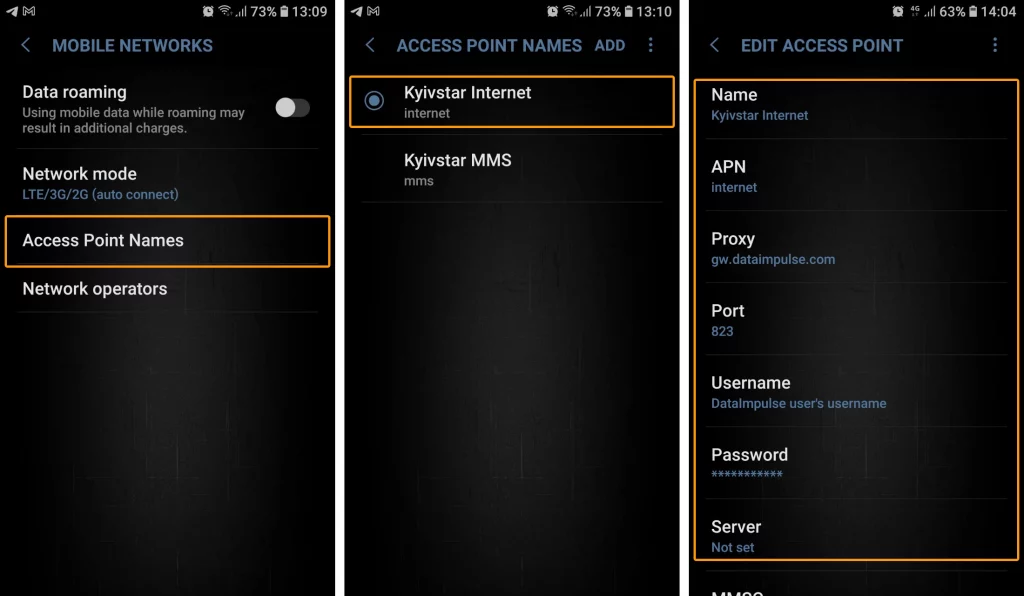
Please note that when using proxies for a mobile network, the connection type is limited to HTTP only.
Residential Proxies
New address: gw.dataimpulse.com
Port: 823
Fill in the Username and Password. Enter your DataImpulse user’s credentials.
- Tap on the three vertical dots located in the top right corner and select the “Save” option.
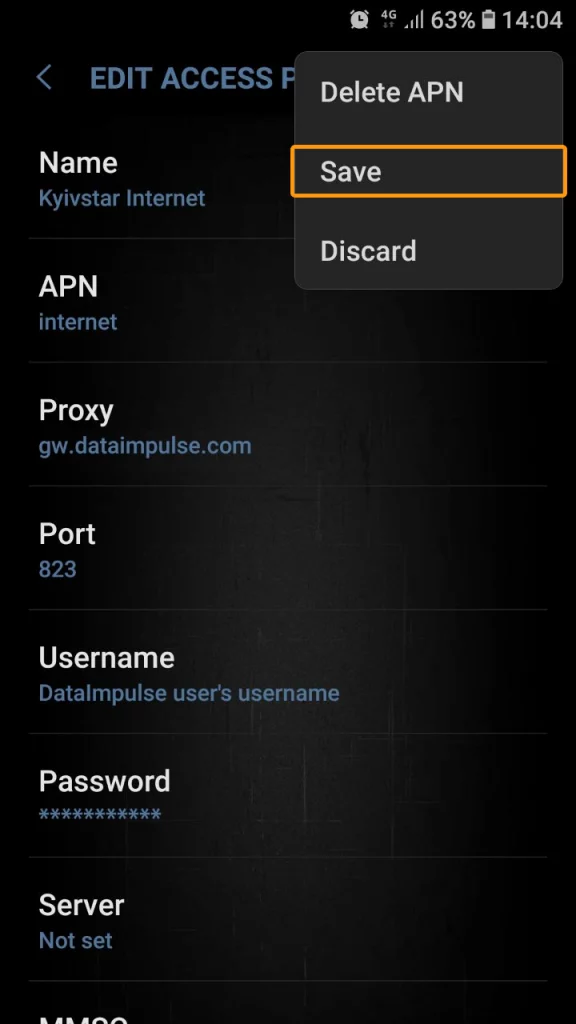
- To apply the changes, restart the network by turning the connection off and then on again.
- Lastly, open your web browser, enter the credentials you provided earlier, and click on the “Sign in” button.
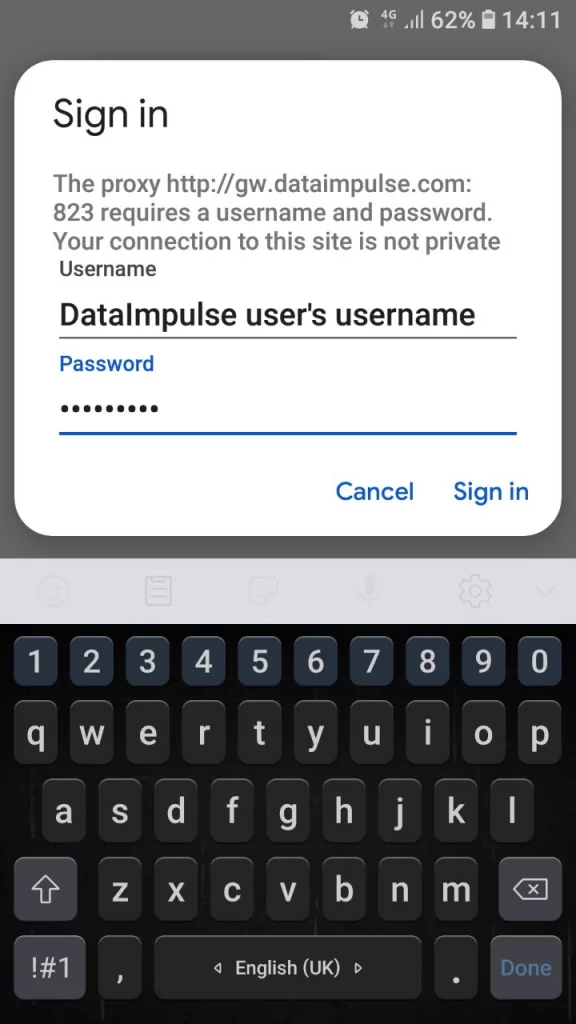
That’s all there is to it! You have successfully configured a proxy IP address for your mobile network.
How to set up a proxy for a Wi-Fi network
To configure proxy settings for a Wi-Fi network, follow these simple steps:
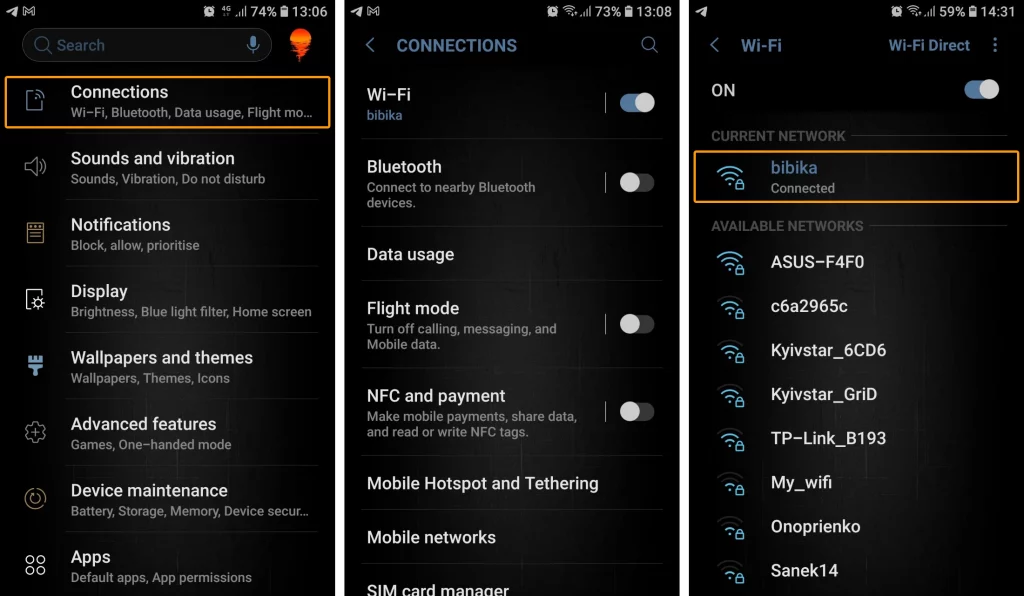
- Go to Settings > Network & internet/ Connections > Internet.
- Access Network details by selecting the gear icon associated with your Wi-Fi network.
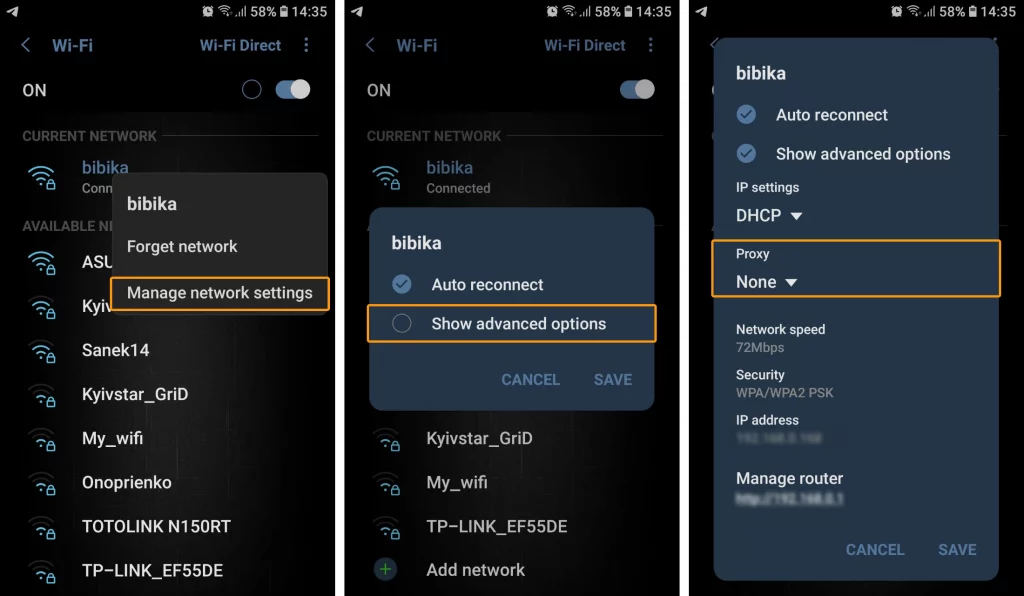
- Tap on the edit button located in the top right corner and expand the Manage network setting section > Show advanced options.
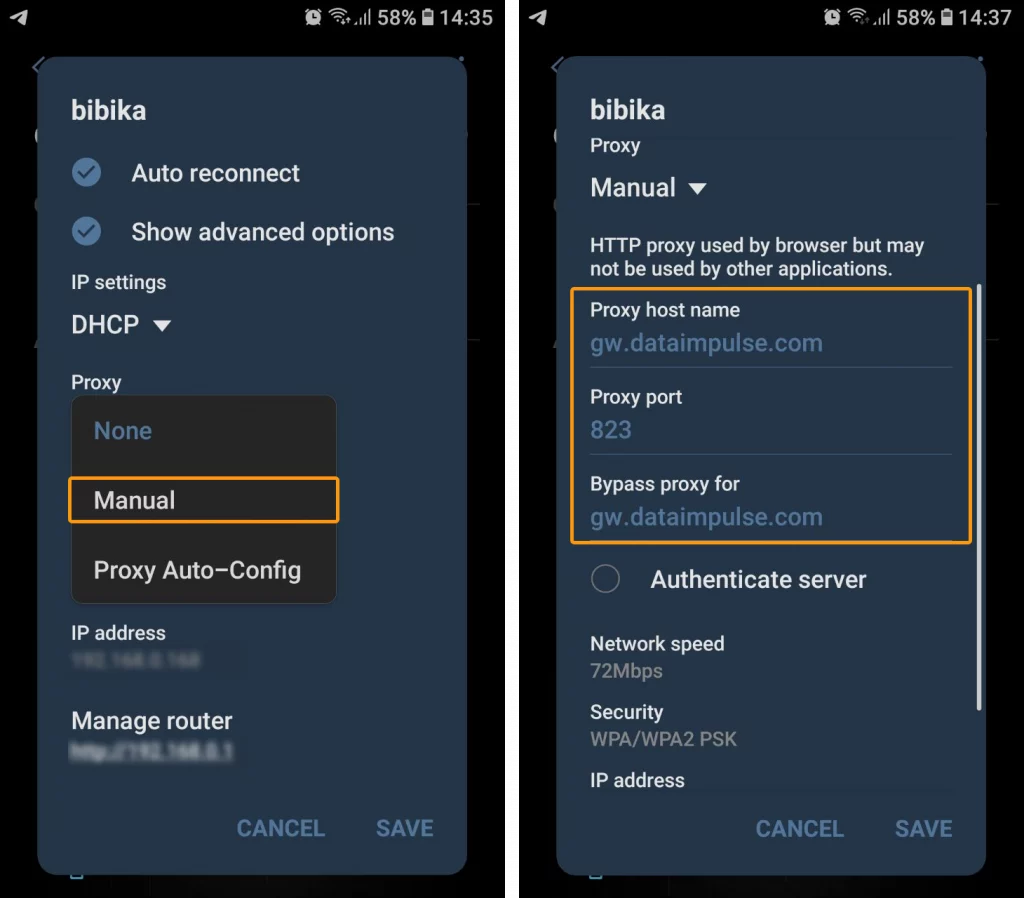
- Go to the Proxy section and select Manual. Enter your proxy details and credentials.
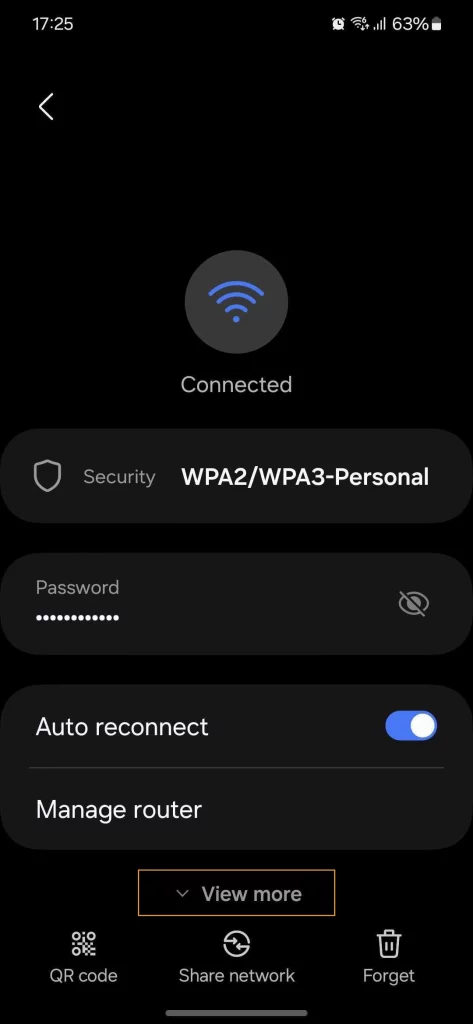
- If you use newer versions of Android, steps 3 and 4 may be invalid; instead, you may need to scroll down and press “View more” to see all the settings and enter credentials.
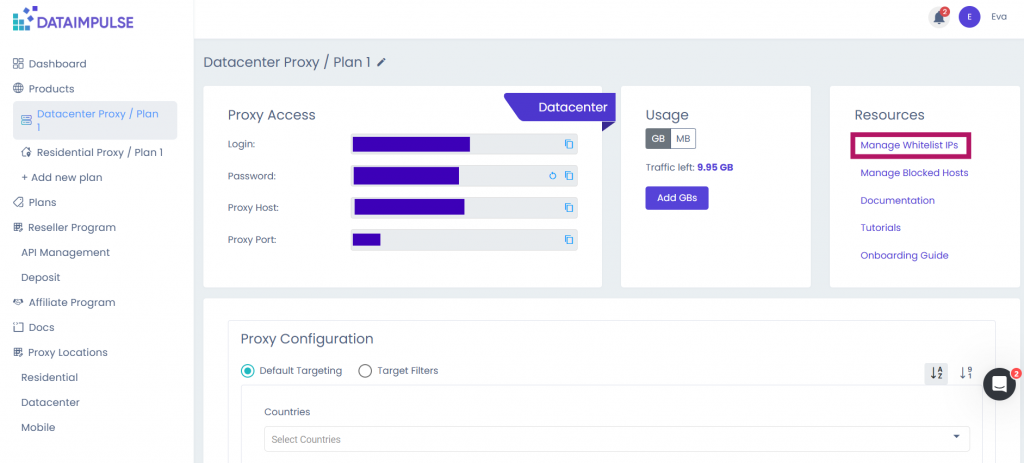
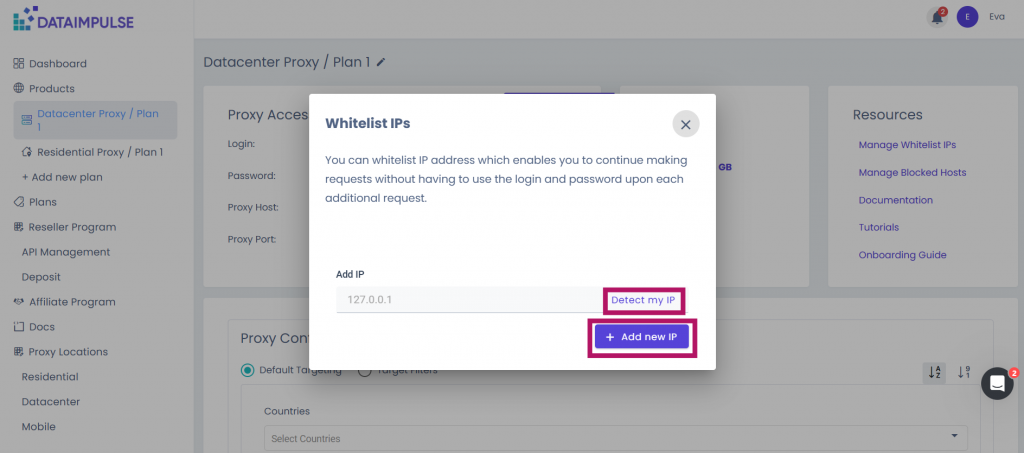
- Go to your DataImpulse dashboard and navigate to the “Manage Whitelist IPs” section. Press “Detect my IP” and click the “Add new IP” button. After that, all the traffic from your device (not only from a browser but also from apps) will be directed via a proxy server. You can do this at the very beginning, too. Note that when you whitelist your IP and try to go online right away, the system may not have enough time to react to changes and will still ask for your credentials. You may just reject it, and still, it will be okay. If you are not sure whether you need it, read more about what whitelisting is first.
Please keep in mind that when using proxies for a Wi-Fi network, the connection type is limited to HTTP(S) only.
Additionally, you can utilize the “Bypass proxy for” option to specify certain websites that should ignore your proxy settings. Simply separate the addresses with commas to create multiple exceptions.
FAQ
Can I set up proxies on Android using mobile data or only Wi-Fi?
Yes, you can set up proxies using mobile data or Wi-Fi - whatever is more convenient for you. Both options take several minutes at most to configure.
What proxy protocols are supported if I configure proxies via a mobile data connection?
When you use a mobile connection, only the HTTP(S) protocol is supported. The same applies to setting up proxies using Wi-Fi. DataImpulse offers the HTTP(S) proxies.
What is whitelisting?
Whitelisting is an alternative to usual credentials-based authentication. Basically, you add your IP address to DataImpulse’s dashboard, and our system always routes traffic from that address via a proxy server without asking for credentials.
Will the proxy apply to all apps or just the browser?
When you use system-level proxies, they apply to all the traffic - from apps and browsers. That is true for both mobile data and Wi-Fi proxy settings. At the same time, as all traffic goes via a proxy server, it may mean some latency and increased costs, so do it only if necessary.
When to set up proxies on a mobile network and when to set up proxies on Wi-Fi?
Mobile networks offer more authenticity, while Wi-Fi proxies give more control, but look less like a “real” human user to mobile platforms and apps. So, the choice depends on what you need to do - if you need to simulate mobile user behavior or are on a sensitive task, go with mobile networks. If you need a reliable connection or cost-efficiency, a Wi-Fi network is a better choice.
If I use DataImpulse proxies on Android, are there any limitations?
DataImpulse supports both setting proxies on mobile and Wi-Fi networks, but the provider is not the best choice if you need to retrieve data from government or banking sources, look for a scraping API, or static proxies. Those restrictions work regardless of the device or OS type you are using.

 State/City/Zip/ASN Targeting