
本文内容
Java是一种平台独立的语言,拥有完善的库、多线程能力和有效的错误处理机制,因此很适合用于网页抓取。本教程将介绍所需的工具,以及如何通过几个步骤让Java网页抓取更顺畅。
使用Java进行网页抓取:要点
虽然Python等更易上手的语言在网页抓取中更受欢迎,但Java也有自身优势,例如:
- JSoup或HtmlUnit等库可简化HTML解析
- 出色的性能、速度和高效的内存管理使Java适合大型项目
- 作为强类型语言,Java可以在编译阶段发现错误
此外,如果你的基础设施基于Java,或计划开展长期项目,Java也是不错的选择。同时,网页抓取经常面临IP封禁、地域限制和安全问题等挑战。为Java项目配置代理,可以帮助你克服这些障碍并获取所需数据。
开始编码前,先来看看需要哪些工具:
- Visual Studio Code(实际上,Visual Studio 2022或任何支持Java的IDE都可以)
- Coding Pack for Java
- Extension Pack for Java
- Apache Maven
如果你刚开始使用Visual Studio Code或Java,这里有关于如何安装Coding Pack和Extension Pack的详细文档。你也可能会觉得这篇教程对安装Apache Maven也有帮助。
注意:仅支持”hostname:port”格式,因此执行代码前需要将你的IP地址加入白名单。你可以在DataImpulse账号中完成此操作。进入相应的代理套餐,在右上角菜单中选择”Manage Whitelist IPs”,然后将该地址加入白名单。如果需要帮助或遇到问题,请查看我们的DataImpulse账号管理详细指南。
HttpClientApp入门
你需要创建一个HTTP客户端,通过代理服务器转发流量。该应用会向指定URL发送请求并接收响应。你可以使用以下代码:
import java.io.BufferedReader;
import java.io.IOException;
import java.io.InputStreamReader;
import java.net.*;
public class HttpClientApp {
public static final String proxyHost = "gw.dataimpulse.com";
public static final int proxyPort = 823;
public static void main(String[] args) {
System.out.println("Performing request through proxy...");
try {
String response = request("https://api.ipify.org");
System.out.println("Your IP address: " + response);
} catch (IOException e) {
System.err.println("Request error: " + e.getMessage());
}
}
public static String request(String url) throws IOException {
// Configure the proxy without authentication
Proxy proxy = new Proxy(Proxy.Type.HTTP, new InetSocketAddress(proxyHost, proxyPort));
// Create and configure the connection
HttpURLConnection connection = (HttpURLConnection) new URL(url).openConnection(proxy);
connection.setRequestMethod("GET");
connection.setRequestProperty("User-Agent", "JavaHttpURLConnection");
// Handle the response
int responseCode = connection.getResponseCode();
String responseMessage = connection.getResponseMessage();
if (responseCode == 200) {
// Successful response
try (BufferedReader reader = new BufferedReader(
new InputStreamReader(connection.getInputStream()))) {
StringBuilder response = new StringBuilder();
String line;
while ((line = reader.readLine()) != null) {
response.append(line);
}
return response.toString();
}
} else {
// Error response with detailed output
StringBuilder errorResponse = new StringBuilder();
if (connection.getErrorStream() != null) {
try (BufferedReader reader = new BufferedReader(
new InputStreamReader(connection.getErrorStream()))) {
String line;
while ((line = reader.readLine()) != null) {
errorResponse.append(line);
}
}
}
throw new IOException("HTTP error: " + responseCode + " " + responseMessage +
(errorResponse.length() > 0 ? "\nError details: " + errorResponse : ""));
}
}
}
输出应如下所示:

构建代理轮换器
仅通过代理服务器转发流量还不够。为增强隐私性,你需要为每个请求使用新的IP。因此,你需要代理轮换器。下面是一个可用的代码示例:
import java.io.BufferedReader;
import java.io.IOException;
import java.io.InputStreamReader;
import java.net.*;
import java.util.Arrays;
import java.util.List;
public class ProxyRotator {
// List of proxies to rotate through
private static final List proxies = Arrays.asList(
new Proxy(Proxy.Type.HTTP, new InetSocketAddress("gw.dataimpulse.com", 10000)),
new Proxy(Proxy.Type.HTTP, new InetSocketAddress("gw.dataimpulse.com", 10001)),
new Proxy(Proxy.Type.HTTP, new InetSocketAddress("gw.dataimpulse.com", 10002))
);
public static void main(String[] args) {
// URL to request
String url = "https://api.ipify.org";
for (Proxy proxy : proxies) {
System.out.println("Using proxy: " + proxy.address());
try {
String response = sendRequestWithProxy(url, proxy);
System.out.println("Request succeeded with proxy " + proxy.address());
System.out.println("IP address from API website: " + response);
} catch (IOException e) {
System.err.println("Request failed with proxy " + proxy.address() + ": " + e.getMessage());
}
System.out.println("------------------------------------------------");
}
}
// Function to send request using a specific proxy
private static String sendRequestWithProxy(String url, Proxy proxy) throws IOException {
HttpURLConnection connection = (HttpURLConnection) new URL(url).openConnection(proxy);
connection.setRequestMethod("GET");
connection.setRequestProperty("User-Agent", "JavaHttpURLConnection");
int responseCode = connection.getResponseCode();
if (responseCode == 200) {
try (BufferedReader reader = new BufferedReader(new InputStreamReader(connection.getInputStream()))) {
StringBuilder response = new StringBuilder();
String line;
while ((line = reader.readLine()) != null) {
response.append(line);
}
return response.toString();
}
} else {
throw new IOException("HTTP error code: " + responseCode + " " + connection.getResponseMessage());
}
}
}
应得到如下结果:

构建代理检测器
现在需要确认代理能否与指定网站正常配合。为此,你需要创建一个代理检测应用,并提供要检测的URL:

你可以尝试以下代码:
import java.io.BufferedReader;
import java.io.IOException;
import java.io.InputStreamReader;
import java.net.*;
import java.util.Arrays;
import java.util.List;
public class ProxyChecker {
// List of proxies to rotate through
private static final List proxies = Arrays.asList(
new Proxy(Proxy.Type.HTTP, new InetSocketAddress("gw.dataimpulse.com", 10000)),
new Proxy(Proxy.Type.HTTP, new InetSocketAddress("gw.dataimpulse.com", 10001)),
new Proxy(Proxy.Type.HTTP, new InetSocketAddress("gw.dataimpulse.com", 10002))
);
// Website to check through proxies
private static final String websiteUrl = "https://api.ipify.org";
public static void main(String[] args) {
System.out.println("Starting Proxy Checker...");
for (Proxy proxy : proxies) {
System.out.println("\nChecking proxy: " + proxy.address());
try {
boolean isWorking = checkProxy(proxy, websiteUrl);
if (isWorking) {
System.out.println("✅ Proxy " + proxy.address() + " works with " + websiteUrl);
} else {
System.out.println("❌ Proxy " + proxy.address() + " does not work with " + websiteUrl);
}
} catch (IOException e) {
System.out.println("❌ Proxy " + proxy.address() + " failed: " + e.getMessage());
}
System.out.println("------------------------------------------------");
}
}
// Function to check if proxy works with the given website
private static boolean checkProxy(Proxy proxy, String url) throws IOException {
HttpURLConnection connection = (HttpURLConnection) new URL(url).openConnection(proxy);
connection.setRequestMethod("GET");
connection.setRequestProperty("User-Agent", "JavaHttpURLConnection");
connection.setConnectTimeout(5000); // 5 seconds timeout
connection.setReadTimeout(5000); // 5 seconds timeout
int responseCode = connection.getResponseCode();
String responseMessage = connection.getResponseMessage();
System.out.println("Response: " + responseCode + " " + responseMessage);
if (responseCode == 200) {
try (BufferedReader reader = new BufferedReader(
new InputStreamReader(connection.getInputStream()))) {
StringBuilder response = new StringBuilder();
String line;
while ((line = reader.readLine()) != null) {
response.append(line);
}
System.out.println("IP Returned: " + response);
}
return true;
} else {
try (BufferedReader reader = new BufferedReader(
new InputStreamReader(connection.getErrorStream()))) {
StringBuilder errorResponse = new StringBuilder();
String line;
while ((line = reader.readLine()) != null) {
errorResponse.append(line);
}
System.out.println("Error details: " + errorResponse);
}
return false;
}
}
}
显示结果应如下所示:

开始网页抓取
最后,该构建网页抓取应用了。它会提取所需数据,因此你需要提供要抓取的目标URL,并指定希望程序获取的数据。在本示例中,我们将从主页抓取链接。你可以参考以下代码:
package com.dataimpulse;
import org.jsoup.Jsoup;
import org.jsoup.nodes.Document;
import org.jsoup.nodes.Element;
import org.jsoup.select.Elements;
import java.io.BufferedReader;
import java.io.IOException;
import java.io.InputStreamReader;
import java.net.*;
import java.nio.charset.StandardCharsets;
public class ProxyWebScraper {
// Proxy configuration
private static final String PROXY_HOST = "gw.dataimpulse.com";
private static final int PROXY_PORT = 823;
// Target website to scrape
private static final String TARGET_URL = "https://dataimpulse.com/";
public static void main(String[] args) {
System.out.println("Starting Proxy Web Scraper...");
try {
// Perform the web scraping through the proxy
String htmlContent = getHtmlContent(TARGET_URL);
if (htmlContent != null) {
// Parse and extract links from the HTML content
parseHtml(htmlContent);
} else {
System.out.println("Failed to retrieve HTML content.");
}
} catch (IOException e) {
System.err.println("Error during scraping: " + e.getMessage());
}
}
// Method to get HTML content through the proxy
private static String getHtmlContent(String url) throws IOException {
// Configure proxy
Proxy proxy = new Proxy(Proxy.Type.HTTP, new InetSocketAddress(PROXY_HOST, PROXY_PORT));
// Create and configure the connection
HttpURLConnection connection = (HttpURLConnection) new URL(url).openConnection(proxy);
connection.setRequestMethod("GET");
connection.setRequestProperty("User-Agent", "JavaWebScraper/1.0");
connection.setConnectTimeout(10000);
connection.setReadTimeout(10000);
int responseCode = connection.getResponseCode();
if (responseCode == 200) {
// Read and return the HTML content
try (BufferedReader reader = new BufferedReader(
new InputStreamReader(connection.getInputStream(), StandardCharsets.UTF_8))) {
StringBuilder content = new StringBuilder();
String line;
while ((line = reader.readLine()) != null) {
content.append(line);
}
return content.toString();
}
} else {
System.err.println("Failed to fetch HTML. HTTP error code: " + responseCode);
return null;
}
}
// Method to parse HTML and extract links using jsoup
private static void parseHtml(String htmlContent) {
Document doc = Jsoup.parse(htmlContent);
Elements links = doc.select("a[href]");
if (links.isEmpty()) {
System.out.println("No links found on the page.");
} else {
System.out.println("Links found:");
for (Element link : links) {
String href = link.attr("abs:href");
String title = link.text();
System.out.println("Title: " + title + ", Link: " + href);
}
}
}
}
不过,还有一项操作。为完成配置并确保抓取应用正常运行,你需要使用Maven安装JSoup库。具体步骤如下:
- 使用相应按钮创建Java项目。

- 选择Maven 作为项目类型。

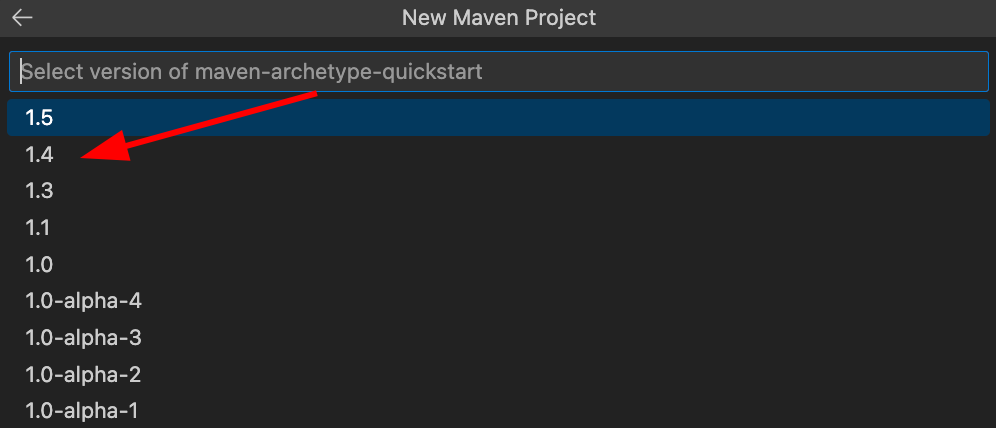
- 从列表中选择”maven-archetype-quickstart”:

- 选择maven-archetype-quickstart的”1.4″版本。
- 输入”com.dataimpulse”作为group ID。

- 在”artifact Id”字段中输入”proxy-scraper”。

- 选择一个文件夹来存放库和ProxyWebScraper应用。随后会出现proxy-scraper文件夹。现在,将代码移至proxy-scraper/src/main/java/com/dataimpulse:

- 按照下方截图所示,通过Apache Maven添加JSoup库。操作正确后,该库会出现在”pom.xml”文件中。

- 在”pom.xml”文件中,将”maven.compiler.source”和”maven.compiler.target”参数设为1.8。Windows使用CTRL+S保存文件,Mac使用CMD+S保存文件。

- 现在,代码应该可以正常运行。要执行代码,请使用屏幕右上角的按钮。

这是我们抓取项目的最终结果:

如你所见,我们已获得所需的全部数据。通过修改代码,你还可以获取任何所需的HTML数据。此外,代理应谨慎选择,因为要取得这类结果,离不开来源合法的IP。DataImpulse提供1500万个以合乎道德方式获取的地址,这些地址与传播恶意软件等违法活动无关。遇到困难时,我们的人工支持团队可24/7为你服务。你还可以调整定位,使其符合地域访问政策。同时,我们采用按用量付费的定价模式,代理不会耗尽你的预算,价格低至每1GB $1。请通过[email protected]联系我们开始使用,或点击屏幕右上角的”立即试用“按钮。