
In questo articolo
Poiché Java è un linguaggio indipendente dalla piattaforma, con librerie solide, funzionalità di multithreading ed efficaci meccanismi di gestione degli errori, è una buona scelta per il web scraping. In questo tutorial dettagliato scoprirai quali strumenti ti servono e quali passaggi seguire per rendere più efficiente lo scraping in Java.
Web scraping con Java: punti chiave
Sebbene linguaggi più semplici, come Python, siano più popolari per il web scraping, anche Java ha i suoi punti di forza, ad esempio:
- Librerie come JSoup o HtmlUnit semplificano il parsing HTML
- Prestazioni, velocità e gestione efficiente della memoria rendono Java adatto a progetti su larga scala
- Essendo un linguaggio a tipizzazione forte, Java consente di individuare gli errori in fase di compilazione
Inoltre, Java è un’opzione valida se la tua infrastruttura si basa su Java o se punti a progetti di lungo periodo. Allo stesso tempo, il web scraping comporta spesso sfide quali blocchi degli IP, limitazioni geografiche e problemi di sicurezza. Supportare il tuo progetto Java con i proxy ti aiuta a superare questi ostacoli e a ottenere i dati necessari.
Prima di passare al codice, vediamo quali strumenti ti serviranno:
- Visual Studio Code (in realtà, va bene anche Visual Studio 2022 o qualsiasi altro IDE che supporti Java)
- Coding Pack per Java
- Extension Pack per Java
- Apache Maven
Se non conosci ancora Visual Studio Code o Java, qui trovi la documentazione con spiegazioni dettagliate su come installare Coding Pack ed Extension Pack. Potresti anche trovare utile questo tutorial sull’installazione di Apache Maven.
Nota: è supportato solo il formato “hostname:port”, quindi dovrai inserire il tuo indirizzo IP nella whitelist prima di eseguire il codice. Puoi farlo dal tuo account DataImpulse. Vai al piano proxy necessario, seleziona “Gestisci gli IP nella whitelist” dal menu in alto a destra e inserisci il tuo indirizzo nella whitelist. Se hai bisogno di assistenza o riscontri problemi, consulta la nostra guida dettagliata per gestire il tuo account DataImpulse.
Primi passi con HttpClientApp
Devi creare un client HTTP per instradare il traffico attraverso un server proxy. Questa app invia richieste all’URL designato e riceve risposte. Puoi usare il codice seguente:
import java.io.BufferedReader;
import java.io.IOException;
import java.io.InputStreamReader;
import java.net.*;
public class HttpClientApp {
public static final String proxyHost = "gw.dataimpulse.com";
public static final int proxyPort = 823;
public static void main(String[] args) {
System.out.println("Performing request through proxy...");
try {
String response = request("https://api.ipify.org");
System.out.println("Your IP address: " + response);
} catch (IOException e) {
System.err.println("Request error: " + e.getMessage());
}
}
public static String request(String url) throws IOException {
// Configure the proxy without authentication
Proxy proxy = new Proxy(Proxy.Type.HTTP, new InetSocketAddress(proxyHost, proxyPort));
// Create and configure the connection
HttpURLConnection connection = (HttpURLConnection) new URL(url).openConnection(proxy);
connection.setRequestMethod("GET");
connection.setRequestProperty("User-Agent", "JavaHttpURLConnection");
// Handle the response
int responseCode = connection.getResponseCode();
String responseMessage = connection.getResponseMessage();
if (responseCode == 200) {
// Successful response
try (BufferedReader reader = new BufferedReader(
new InputStreamReader(connection.getInputStream()))) {
StringBuilder response = new StringBuilder();
String line;
while ((line = reader.readLine()) != null) {
response.append(line);
}
return response.toString();
}
} else {
// Error response with detailed output
StringBuilder errorResponse = new StringBuilder();
if (connection.getErrorStream() != null) {
try (BufferedReader reader = new BufferedReader(
new InputStreamReader(connection.getErrorStream()))) {
String line;
while ((line = reader.readLine()) != null) {
errorResponse.append(line);
}
}
}
throw new IOException("HTTP error: " + responseCode + " " + responseMessage +
(errorResponse.length() > 0 ? "\nError details: " + errorResponse : ""));
}
}
}
L’output dovrebbe avere questo aspetto:

Creare un rotatore di proxy
Instradare il traffico attraverso un server proxy non basta. Per migliorare la privacy, devi usare un nuovo IP per ogni richiesta. Ecco perché ti serve un rotatore di proxy. Di seguito trovi un esempio di codice che puoi usare:
import java.io.BufferedReader;
import java.io.IOException;
import java.io.InputStreamReader;
import java.net.*;
import java.util.Arrays;
import java.util.List;
public class ProxyRotator {
// List of proxies to rotate through
private static final List proxies = Arrays.asList(
new Proxy(Proxy.Type.HTTP, new InetSocketAddress("gw.dataimpulse.com", 10000)),
new Proxy(Proxy.Type.HTTP, new InetSocketAddress("gw.dataimpulse.com", 10001)),
new Proxy(Proxy.Type.HTTP, new InetSocketAddress("gw.dataimpulse.com", 10002))
);
public static void main(String[] args) {
// URL to request
String url = "https://api.ipify.org";
for (Proxy proxy : proxies) {
System.out.println("Using proxy: " + proxy.address());
try {
String response = sendRequestWithProxy(url, proxy);
System.out.println("Request succeeded with proxy " + proxy.address());
System.out.println("IP address from API website: " + response);
} catch (IOException e) {
System.err.println("Request failed with proxy " + proxy.address() + ": " + e.getMessage());
}
System.out.println("------------------------------------------------");
}
}
// Function to send request using a specific proxy
private static String sendRequestWithProxy(String url, Proxy proxy) throws IOException {
HttpURLConnection connection = (HttpURLConnection) new URL(url).openConnection(proxy);
connection.setRequestMethod("GET");
connection.setRequestProperty("User-Agent", "JavaHttpURLConnection");
int responseCode = connection.getResponseCode();
if (responseCode == 200) {
try (BufferedReader reader = new BufferedReader(new InputStreamReader(connection.getInputStream()))) {
StringBuilder response = new StringBuilder();
String line;
while ((line = reader.readLine()) != null) {
response.append(line);
}
return response.toString();
}
} else {
throw new IOException("HTTP error code: " + responseCode + " " + connection.getResponseMessage());
}
}
}
Dovresti ottenere un risultato simile a questo:

Creare un verificatore di proxy
È il momento di verificare che i nostri proxy funzionino con un determinato sito web. Per farlo, devi creare un’app per verificare i proxy e fornire un URL da controllare:

Ecco un codice che puoi provare:
import java.io.BufferedReader;
import java.io.IOException;
import java.io.InputStreamReader;
import java.net.*;
import java.util.Arrays;
import java.util.List;
public class ProxyChecker {
// List of proxies to rotate through
private static final List proxies = Arrays.asList(
new Proxy(Proxy.Type.HTTP, new InetSocketAddress("gw.dataimpulse.com", 10000)),
new Proxy(Proxy.Type.HTTP, new InetSocketAddress("gw.dataimpulse.com", 10001)),
new Proxy(Proxy.Type.HTTP, new InetSocketAddress("gw.dataimpulse.com", 10002))
);
// Website to check through proxies
private static final String websiteUrl = "https://api.ipify.org";
public static void main(String[] args) {
System.out.println("Starting Proxy Checker...");
for (Proxy proxy : proxies) {
System.out.println("\nChecking proxy: " + proxy.address());
try {
boolean isWorking = checkProxy(proxy, websiteUrl);
if (isWorking) {
System.out.println("✅ Proxy " + proxy.address() + " works with " + websiteUrl);
} else {
System.out.println("❌ Proxy " + proxy.address() + " does not work with " + websiteUrl);
}
} catch (IOException e) {
System.out.println("❌ Proxy " + proxy.address() + " failed: " + e.getMessage());
}
System.out.println("------------------------------------------------");
}
}
// Function to check if proxy works with the given website
private static boolean checkProxy(Proxy proxy, String url) throws IOException {
HttpURLConnection connection = (HttpURLConnection) new URL(url).openConnection(proxy);
connection.setRequestMethod("GET");
connection.setRequestProperty("User-Agent", "JavaHttpURLConnection");
connection.setConnectTimeout(5000); // 5 seconds timeout
connection.setReadTimeout(5000); // 5 seconds timeout
int responseCode = connection.getResponseCode();
String responseMessage = connection.getResponseMessage();
System.out.println("Response: " + responseCode + " " + responseMessage);
if (responseCode == 200) {
try (BufferedReader reader = new BufferedReader(
new InputStreamReader(connection.getInputStream()))) {
StringBuilder response = new StringBuilder();
String line;
while ((line = reader.readLine()) != null) {
response.append(line);
}
System.out.println("IP Returned: " + response);
}
return true;
} else {
try (BufferedReader reader = new BufferedReader(
new InputStreamReader(connection.getErrorStream()))) {
StringBuilder errorResponse = new StringBuilder();
String line;
while ((line = reader.readLine()) != null) {
errorResponse.append(line);
}
System.out.println("Error details: " + errorResponse);
}
return false;
}
}
}
I risultati visualizzati dovrebbero avere questo aspetto:

Passare al web scraping vero e proprio
Infine, è il momento di creare un’app per il web scraping. Estrarrà tutti i dati necessari, quindi devi fornire l’URL di destinazione da sottoporre a scraping e specificare quali dati vuoi che il programma recuperi. Nel nostro caso, estrarremo i link dalla nostra homepage. Puoi usare questo codice come riferimento:
package com.dataimpulse;
import org.jsoup.Jsoup;
import org.jsoup.nodes.Document;
import org.jsoup.nodes.Element;
import org.jsoup.select.Elements;
import java.io.BufferedReader;
import java.io.IOException;
import java.io.InputStreamReader;
import java.net.*;
import java.nio.charset.StandardCharsets;
public class ProxyWebScraper {
// Proxy configuration
private static final String PROXY_HOST = "gw.dataimpulse.com";
private static final int PROXY_PORT = 823;
// Target website to scrape
private static final String TARGET_URL = "https://dataimpulse.com/";
public static void main(String[] args) {
System.out.println("Starting Proxy Web Scraper...");
try {
// Perform the web scraping through the proxy
String htmlContent = getHtmlContent(TARGET_URL);
if (htmlContent != null) {
// Parse and extract links from the HTML content
parseHtml(htmlContent);
} else {
System.out.println("Failed to retrieve HTML content.");
}
} catch (IOException e) {
System.err.println("Error during scraping: " + e.getMessage());
}
}
// Method to get HTML content through the proxy
private static String getHtmlContent(String url) throws IOException {
// Configure proxy
Proxy proxy = new Proxy(Proxy.Type.HTTP, new InetSocketAddress(PROXY_HOST, PROXY_PORT));
// Create and configure the connection
HttpURLConnection connection = (HttpURLConnection) new URL(url).openConnection(proxy);
connection.setRequestMethod("GET");
connection.setRequestProperty("User-Agent", "JavaWebScraper/1.0");
connection.setConnectTimeout(10000);
connection.setReadTimeout(10000);
int responseCode = connection.getResponseCode();
if (responseCode == 200) {
// Read and return the HTML content
try (BufferedReader reader = new BufferedReader(
new InputStreamReader(connection.getInputStream(), StandardCharsets.UTF_8))) {
StringBuilder content = new StringBuilder();
String line;
while ((line = reader.readLine()) != null) {
content.append(line);
}
return content.toString();
}
} else {
System.err.println("Failed to fetch HTML. HTTP error code: " + responseCode);
return null;
}
}
// Method to parse HTML and extract links using jsoup
private static void parseHtml(String htmlContent) {
Document doc = Jsoup.parse(htmlContent);
Elements links = doc.select("a[href]");
if (links.isEmpty()) {
System.out.println("No links found on the page.");
} else {
System.out.println("Links found:");
for (Element link : links) {
String href = link.attr("abs:href");
String title = link.text();
System.out.println("Title: " + title + ", Link: " + href);
}
}
}
}
Tuttavia, c’è un’altra cosa da fare. Per completare il processo e assicurarti che la tua app di scraping funzioni correttamente, devi installare la libreria JSoup usando Maven. Ecco come farlo passo dopo passo:
- Crea un progetto Java usando il pulsante corrispondente.

- Seleziona Maven come tipo di progetto.

- Dall’elenco visualizzato, scegli “maven-archetype-quickstart”:

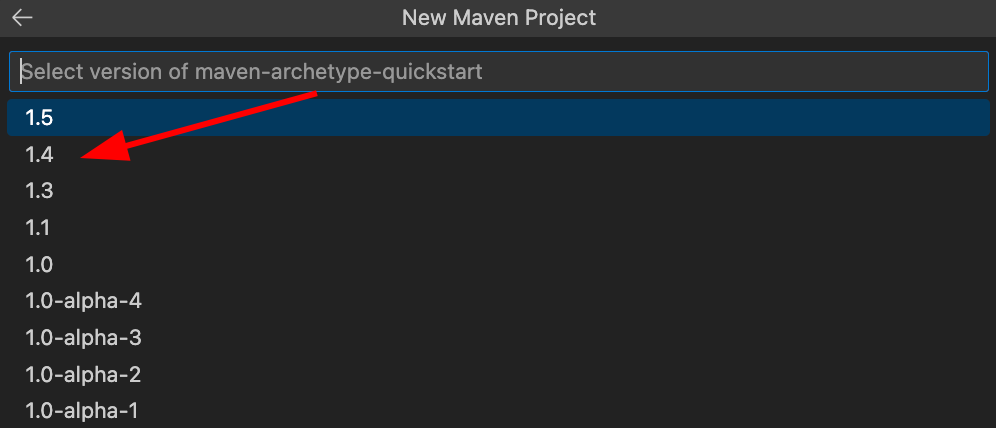
- Scegli la versione “1.4” di maven-archetype-quickstart.
- Inserisci “com.dataimpulse” come ID del gruppo.

- Inserisci “proxy-scraper” nel campo “ID dell’artefatto”.

- Scegli una cartella in cui salvare la libreria e l’app ProxyWebScraper. In seguito dovrebbe comparire la cartella proxy-scraper. Ora sposta il codice in proxy-scraper/src/main/java/com/dataimpulse:

- Aggiungi la libreria JSoup tramite Apache Maven, come mostrato nello screenshot qui sotto. Se esegui correttamente l’operazione, la libreria comparirà nel file “pom.xml”.

- Nel file “pom.xml” modifica i parametri “maven.compiler.source” e “maven.compiler.target” impostandoli su 1.8. Salva il file con CTRL+S su Windows o CMD+S su Mac.

- Ora il tuo codice dovrebbe funzionare correttamente. Per eseguirlo, usa il pulsante nell’angolo in alto a destra dello schermo.

Ecco il risultato finale del nostro progetto di scraping:

Come puoi vedere, ora abbiamo tutti i dati che volevamo. Tuttavia, modificando il codice puoi ottenere qualsiasi dato HTML ti serva. Inoltre, dovresti scegliere con cura i proxy, poiché risultati di questo tipo sono impossibili senza IP ottenuti legalmente. Con DataImpulse puoi ottenere 15 milioni di indirizzi acquisiti eticamente, non associati ad attività illecite come la diffusione di malware. Se riscontri difficoltà, il nostro team di assistenza umana è al tuo servizio 24/7. Puoi anche regolare il targeting per allinearti alle politiche di accesso territoriali. Allo stesso tempo, i nostri proxy non peseranno sul tuo budget, perché adottiamo un modello tariffario a consumo e offriamo un prezzo conveniente di $1 per 1GB. Inizia con noi scrivendo a [email protected] o usa il pulsante “Prova ora” nell’angolo in alto a destra dello schermo.