
이 글의 내용
Java 는 플랫폼에 독립적이며 강력한 라이브러리, 멀티스레딩 기능, 효과적인 오류 처리 메커니즘을 갖춘 언어이므로 웹 스크래핑에 적합합니다. 이 상세 튜토리얼에서는 Java 에서 스크래핑을 효율화하는 데 필요한 도구와 따라야 할 단계를 안내합니다.
Java 를 사용한 웹 스크래핑: 핵심 사항
Python 처럼 더 간단한 언어가 웹 스크래핑에는 더 널리 사용되지만, Java 에도 다음과 같은 강점이 있습니다.
- JSoup 또는 HtmlUnit 같은 라이브러리는 HTML 파싱을 간소화합니다.
- 성능, 속도, 효율적인 메모리 관리는 Java 를 대규모 프로젝트에 적합하게 만듭니다.
- Java 는 강타입 언어이므로 컴파일 시점에 오류를 포착할 수 있습니다.
또한 인프라가 Java 에 의존하거나 장기 프로젝트를 목표로 한다면 Java 도 선택지가 됩니다. 동시에 웹 스크래핑에는 IP 차단, 지역 기반 제한, 보안 문제 같은 어려움이 자주 따릅니다. Java 프로젝트를 프록시로 뒷받침하면 이러한 장애물을 극복하고 필요한 데이터를 얻는 데 도움이 됩니다.
코딩을 시작하기 전에 필요한 도구를 살펴보겠습니다.
- Visual Studio Code (사실 Visual Studio 2022 또는 Java 를 지원하는 다른 IDE 도 좋습니다)
- The Coding Pack for Java
- Extension Pack for Java
- Apache Maven
Visual Studio Code 또는 Java 가 처음이라면 여기에서 Coding Pack 과 Extension Pack 설치 방법을 자세히 설명한 문서를 확인할 수 있습니다. 또한 이 튜토리얼에서 Apache Maven 설치 방법을 확인할 수 있습니다.
참고: “hostname:port” 형식만 지원하므로 코드를 실행하기 전에 IP 주소를 화이트리스트에 추가해야 합니다. DataImpulse 계정에서 이 작업을 할 수 있습니다. 필요한 프록시 요금제로 이동한 뒤 오른쪽 상단 메뉴에서 “Manage Whitelist IPs”를 선택하고 주소를 화이트리스트에 추가합니다. 도움이 필요하거나 문제가 발생하면 DataImpulse 계정 관리 상세 가이드.
HttpClientApp 시작하기
프록시 서버를 통해 트래픽을 라우팅하려면 HTTP 클라이언트를 만들어야 합니다. 이 앱은 지정한 URL 로 요청을 보내고 응답을 받습니다. 아래 코드를 사용할 수 있습니다.
import java.io.BufferedReader;
import java.io.IOException;
import java.io.InputStreamReader;
import java.net.*;
public class HttpClientApp {
public static final String proxyHost = "gw.dataimpulse.com";
public static final int proxyPort = 823;
public static void main(String[] args) {
System.out.println("Performing request through proxy...");
try {
String response = request("https://api.ipify.org");
System.out.println("Your IP address: " + response);
} catch (IOException e) {
System.err.println("Request error: " + e.getMessage());
}
}
public static String request(String url) throws IOException {
// Configure the proxy without authentication
Proxy proxy = new Proxy(Proxy.Type.HTTP, new InetSocketAddress(proxyHost, proxyPort));
// Create and configure the connection
HttpURLConnection connection = (HttpURLConnection) new URL(url).openConnection(proxy);
connection.setRequestMethod("GET");
connection.setRequestProperty("User-Agent", "JavaHttpURLConnection");
// Handle the response
int responseCode = connection.getResponseCode();
String responseMessage = connection.getResponseMessage();
if (responseCode == 200) {
// Successful response
try (BufferedReader reader = new BufferedReader(
new InputStreamReader(connection.getInputStream()))) {
StringBuilder response = new StringBuilder();
String line;
while ((line = reader.readLine()) != null) {
response.append(line);
}
return response.toString();
}
} else {
// Error response with detailed output
StringBuilder errorResponse = new StringBuilder();
if (connection.getErrorStream() != null) {
try (BufferedReader reader = new BufferedReader(
new InputStreamReader(connection.getErrorStream()))) {
String line;
while ((line = reader.readLine()) != null) {
errorResponse.append(line);
}
}
}
throw new IOException("HTTP error: " + responseCode + " " + responseMessage +
(errorResponse.length() > 0 ? "\nError details: " + errorResponse : ""));
}
}
}
출력은 다음과 같아야 합니다.

프록시 로테이터 만들기
프록시 서버를 통해 트래픽을 라우팅하는 것만으로는 충분하지 않습니다. 개인정보 보호를 강화하려면 요청마다 새 IP 를 사용해야 합니다. 그래서 프록시 로테이터가 필요합니다. 다음은 사용할 수 있는 코드 예시입니다.
import java.io.BufferedReader;
import java.io.IOException;
import java.io.InputStreamReader;
import java.net.*;
import java.util.Arrays;
import java.util.List;
public class ProxyRotator {
// List of proxies to rotate through
private static final List proxies = Arrays.asList(
new Proxy(Proxy.Type.HTTP, new InetSocketAddress("gw.dataimpulse.com", 10000)),
new Proxy(Proxy.Type.HTTP, new InetSocketAddress("gw.dataimpulse.com", 10001)),
new Proxy(Proxy.Type.HTTP, new InetSocketAddress("gw.dataimpulse.com", 10002))
);
public static void main(String[] args) {
// URL to request
String url = "https://api.ipify.org";
for (Proxy proxy : proxies) {
System.out.println("Using proxy: " + proxy.address());
try {
String response = sendRequestWithProxy(url, proxy);
System.out.println("Request succeeded with proxy " + proxy.address());
System.out.println("IP address from API website: " + response);
} catch (IOException e) {
System.err.println("Request failed with proxy " + proxy.address() + ": " + e.getMessage());
}
System.out.println("------------------------------------------------");
}
}
// Function to send request using a specific proxy
private static String sendRequestWithProxy(String url, Proxy proxy) throws IOException {
HttpURLConnection connection = (HttpURLConnection) new URL(url).openConnection(proxy);
connection.setRequestMethod("GET");
connection.setRequestProperty("User-Agent", "JavaHttpURLConnection");
int responseCode = connection.getResponseCode();
if (responseCode == 200) {
try (BufferedReader reader = new BufferedReader(new InputStreamReader(connection.getInputStream()))) {
StringBuilder response = new StringBuilder();
String line;
while ((line = reader.readLine()) != null) {
response.append(line);
}
return response.toString();
}
} else {
throw new IOException("HTTP error code: " + responseCode + " " + connection.getResponseMessage());
}
}
}
이 코드에서는 다음과 같은 결과가 나와야 합니다.

프록시 검사기 만들기
이제 프록시가 지정한 웹사이트에서 작동하는지 확인할 차례입니다. 이를 위해 프록시 검사기 앱을 만들고 확인할 URL 을 제공해야 합니다.

시도해 볼 수 있는 코드는 다음과 같습니다.
import java.io.BufferedReader;
import java.io.IOException;
import java.io.InputStreamReader;
import java.net.*;
import java.util.Arrays;
import java.util.List;
public class ProxyChecker {
// List of proxies to rotate through
private static final List proxies = Arrays.asList(
new Proxy(Proxy.Type.HTTP, new InetSocketAddress("gw.dataimpulse.com", 10000)),
new Proxy(Proxy.Type.HTTP, new InetSocketAddress("gw.dataimpulse.com", 10001)),
new Proxy(Proxy.Type.HTTP, new InetSocketAddress("gw.dataimpulse.com", 10002))
);
// Website to check through proxies
private static final String websiteUrl = "https://api.ipify.org";
public static void main(String[] args) {
System.out.println("Starting Proxy Checker...");
for (Proxy proxy : proxies) {
System.out.println("\nChecking proxy: " + proxy.address());
try {
boolean isWorking = checkProxy(proxy, websiteUrl);
if (isWorking) {
System.out.println("✅ Proxy " + proxy.address() + " works with " + websiteUrl);
} else {
System.out.println("❌ Proxy " + proxy.address() + " does not work with " + websiteUrl);
}
} catch (IOException e) {
System.out.println("❌ Proxy " + proxy.address() + " failed: " + e.getMessage());
}
System.out.println("------------------------------------------------");
}
}
// Function to check if proxy works with the given website
private static boolean checkProxy(Proxy proxy, String url) throws IOException {
HttpURLConnection connection = (HttpURLConnection) new URL(url).openConnection(proxy);
connection.setRequestMethod("GET");
connection.setRequestProperty("User-Agent", "JavaHttpURLConnection");
connection.setConnectTimeout(5000); // 5 seconds timeout
connection.setReadTimeout(5000); // 5 seconds timeout
int responseCode = connection.getResponseCode();
String responseMessage = connection.getResponseMessage();
System.out.println("Response: " + responseCode + " " + responseMessage);
if (responseCode == 200) {
try (BufferedReader reader = new BufferedReader(
new InputStreamReader(connection.getInputStream()))) {
StringBuilder response = new StringBuilder();
String line;
while ((line = reader.readLine()) != null) {
response.append(line);
}
System.out.println("IP Returned: " + response);
}
return true;
} else {
try (BufferedReader reader = new BufferedReader(
new InputStreamReader(connection.getErrorStream()))) {
StringBuilder errorResponse = new StringBuilder();
String line;
while ((line = reader.readLine()) != null) {
errorResponse.append(line);
}
System.out.println("Error details: " + errorResponse);
}
return false;
}
}
}
표시되는 결과는 다음과 같아야 합니다.

웹 스크래핑 시작하기
마지막으로 웹 스크래핑 앱을 만들 차례입니다. 이 앱은 필요한 모든 데이터를 추출하므로, 스크래핑할 대상 URL 을 제공하고 프로그램이 가져올 데이터를 지정해야 합니다. 여기서는 홈페이지에서 링크를 스크래핑합니다. 다음 코드를 참고할 수 있습니다.
package com.dataimpulse;
import org.jsoup.Jsoup;
import org.jsoup.nodes.Document;
import org.jsoup.nodes.Element;
import org.jsoup.select.Elements;
import java.io.BufferedReader;
import java.io.IOException;
import java.io.InputStreamReader;
import java.net.*;
import java.nio.charset.StandardCharsets;
public class ProxyWebScraper {
// Proxy configuration
private static final String PROXY_HOST = "gw.dataimpulse.com";
private static final int PROXY_PORT = 823;
// Target website to scrape
private static final String TARGET_URL = "https://dataimpulse.com/";
public static void main(String[] args) {
System.out.println("Starting Proxy Web Scraper...");
try {
// Perform the web scraping through the proxy
String htmlContent = getHtmlContent(TARGET_URL);
if (htmlContent != null) {
// Parse and extract links from the HTML content
parseHtml(htmlContent);
} else {
System.out.println("Failed to retrieve HTML content.");
}
} catch (IOException e) {
System.err.println("Error during scraping: " + e.getMessage());
}
}
// Method to get HTML content through the proxy
private static String getHtmlContent(String url) throws IOException {
// Configure proxy
Proxy proxy = new Proxy(Proxy.Type.HTTP, new InetSocketAddress(PROXY_HOST, PROXY_PORT));
// Create and configure the connection
HttpURLConnection connection = (HttpURLConnection) new URL(url).openConnection(proxy);
connection.setRequestMethod("GET");
connection.setRequestProperty("User-Agent", "JavaWebScraper/1.0");
connection.setConnectTimeout(10000);
connection.setReadTimeout(10000);
int responseCode = connection.getResponseCode();
if (responseCode == 200) {
// Read and return the HTML content
try (BufferedReader reader = new BufferedReader(
new InputStreamReader(connection.getInputStream(), StandardCharsets.UTF_8))) {
StringBuilder content = new StringBuilder();
String line;
while ((line = reader.readLine()) != null) {
content.append(line);
}
return content.toString();
}
} else {
System.err.println("Failed to fetch HTML. HTTP error code: " + responseCode);
return null;
}
}
// Method to parse HTML and extract links using jsoup
private static void parseHtml(String htmlContent) {
Document doc = Jsoup.parse(htmlContent);
Elements links = doc.select("a[href]");
if (links.isEmpty()) {
System.out.println("No links found on the page.");
} else {
System.out.println("Links found:");
for (Element link : links) {
String href = link.attr("abs:href");
String title = link.text();
System.out.println("Title: " + title + ", Link: " + href);
}
}
}
}
하지만 추가로 해야 할 일이 있습니다. To finalize the process and ensure your scraping app works correctly, you need to install the JSoup library using Maven. Here is a step-by-step explanation of how to do it:
- 해당 버튼을 사용해 Java 프로젝트를 만듭니다.

- Maven as the project type.

- 표시된 목록에서 “maven-archetype-quickstart”를 선택합니다.

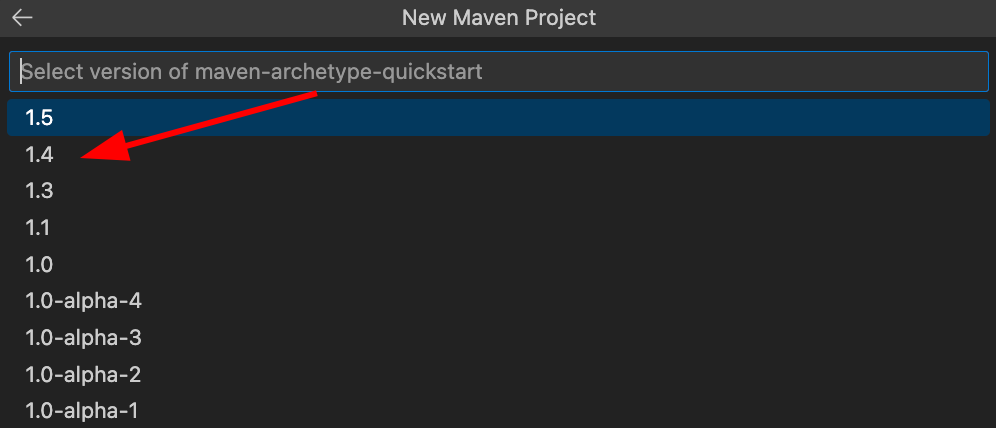
- maven-archetype-quickstart 의 “1.4” 버전을 선택합니다.
- group id 로 “com.dataimpulse”를 입력합니다.

- “artifact Id” 필드에 “proxy-scraper”를 입력합니다.

- 라이브러리와 ProxyWebScraper 앱 자체를 저장할 폴더를 선택합니다. 그러면 proxy-scraper 폴더가 표시되어야 합니다. 이제 코드를 proxy-scraper/src/main/java/com/dataimpulse:

- Add the JSoup library via Apache Maven, as shown in the screenshot below. If you do it right, the library will appear in the “pom.xml” file.

- “pom.xml” 파일에서 “maven.compiler.source” 및 “maven.compiler.target” 매개변수를 1.8 로 변경합니다. Windows 에서는 CTRL+S, Mac 에서는 CMD+S 를 사용해 파일을 저장합니다.

- 이제 코드가 정상적으로 작동해야 합니다. 실행하려면 화면 오른쪽 상단의 버튼을 사용합니다.

스크래핑 프로젝트의 최종 결과는 다음과 같습니다.

보시다시피 이제 원하는 데이터를 모두 얻었습니다. 다만 코드를 수정하면 필요한 모든 HTML 데이터를 가져올 수 있습니다. 또한 이러한 결과는 정당하게 확보된 IP 없이는 불가능하므로 프록시를 신중하게 선택해야 합니다. DataImpulse 에서는 악성 코드 유포 같은 법 위반 활동과 연관되지 않은, 윤리적으로 확보한 1,500만 개의 주소를 이용할 수 있습니다. 어려움이 있으면 사람이 직접 지원하는 팀이 24/7 도와드립니다. 지역별 접근 정책에 부합하도록 타기팅을 조정할 수도 있습니다. 또한 종량제 가격 모델을 운영하며 1GB 당 $1의 합리적인 가격을 제공하므로 프록시가 예산을 과도하게 소진하지 않습니다. [email protected]에서 시작하거나 화면 오른쪽 상단의 “지금 사용해 보기” button in the top-right corner of the screen.