In this Article
Have you noticed that bans are becoming more frequent than in previous years? Well, there is definitely a reason. While you keep using the same tools for web scraping, current-generation websites are changing faster than you can blink, constantly updating their defense systems and spotting scraping attempts more aggressively than ever. And the results often don’t work in your favor.
But there should be a solution. We want to share how proxies can help you in this scenario. Below, you’ll find a relevant guide if you’re just starting or are already a skilled CloudScraper user. We hope this tutorial will be informative and may CAPTCHAs stop chasing you once and for all.
Why So Many Scrapers Choose CloudScraper
CloudScraper is a beginner-friendly library that demonstrates how Python can be used for automation tasks. Unlike basic request libraries, CloudScraper simulates a real browser by automatically setting headers and mimicking human-like behavior. This makes it capable of handling JavaScript challenges that would typically block standard bots. It’s especially useful for scraping data from sites protected by Cloudflare, as it can solve many of these challenges automatically, saving time and reducing the complexity of building custom solutions.

One of the biggest reasons scrapers choose CloudScraper is its simplicity. It doesn’t rely on full browser automation tools like Selenium, which are heavier and more resource-intensive. Instead, it keeps things quick without drawing attention, giving you safe access without the overhead. For tasks like Cloudflare diagnostics, authenticated data retrieval, or testing endpoint availability, CloudScraper is a reliable and lightweight option.
*Just remember: always scrape responsibly and respect the target website’s terms of service and legal boundaries.
Be Serious, Don’t Skip Proxies
Cloudflare, Akamai, and PerimeterX now present some of the most advanced barriers to web scraping. Traditional scraping techniques often fail due to increasingly sophisticated defenses: dynamic JavaScript challenges, advanced browser fingerprinting, and frequent shifts in challenge logic. Even tools like CloudScraper, which mimic a real browser’s headers and behavior, may fail when facing aggressive fingerprinting or IP-based rate limits.
Proxies are an essential part of any scraping architecture. In Python, proxies are typically injected at the request level using libraries like Requests, Httpx, or Cloudscraper, and can be easily integrated into headless browsers such as Playwright or Puppeteer via their proxy configuration settings. A proxy routes your traffic through an alternate IP, allowing you to:
- Mask your origin IP
- Rotate IPs for high-volume requests
- Ensure uninterrupted access across regions
- Distribute load across multiple sessions
For example, if CloudScraper fails to bypass a challenge, the fallback options usually involve:
- Using a real browser context via Playwright or Puppeteer with stealth plugins
- Adding delays, retries, and randomized headers
- Leveraging residential or mobile proxies for privacy-optimized access
A solid proxy setup from a provider like DataImpulse means fewer connection disruptions, smoother scraping, and better access to content with availability differences.
Step-by-Step Implementation
🧩 Prerequisites
Before you begin, make sure you have the following ready:
- Python 3.7+ installed on your system;
- A working code editor or IDE (we’ll use Visual Studio Code);
- CloudScraper library installed;
- Access to a proxy provider, such as DataImpulse, with valid proxy credentials (username, password, host, and port);
- Optional but recommended: Requests, Pandas, or httpx for more advanced workflows.
Note: Always check the target website’s Terms of Service before scraping. Use proxies responsibly to avoid legal and ethical issues.
⚙️ Setting Up CloudScraper with a Proxy
If you’re new to Python or web scraping, don’t worry. This section walks you through everything from installation to sending your first proxy-powered request using CloudScraper.
- Step 1: Install CloudScraper
First, you need to install the Сloudscraper library. Open your terminal or command prompt and run one of the following commands:
pip install -U cloudscraper
If you’re using Python 3, pip3 is required on your system:
pip3 install cloudscraper
If you have an old version, terminal will send you a notice: To update, run: python3.12 -m pip install –upgrade pip. If it works, you’ll get a similar result:

- Step 2: Initialize by importing
After installing the Сloudscraper library, the next step is to import it into your Python script, so you can use its features. In Python, the import statement allows you to load external libraries (also called “modules”) into your script. These libraries contain pre-written code that you can reuse.
We’re using Visual Studio Code in this tutorial. Launch it, go to File → New File, and save it with a .py extension, for example: cloudscraper_test.py
At the top of the file, add the following line to import the CloudScraper library:
import cloudscraper

After importing, you can create a CloudScraper instance, make web requests, and handle JavaScript challenges from services like Cloudflare.
*Make sure this code line is placed at the very beginning of your Python file. That way, everything that depends on the cloudscraper library will work properly.
- Step 3: Create a CloudScraper Instance
Before making requests, you need to create a Сloudscraper object. This object acts like a browser.
scraper = cloudscraper.create_scraper()

- Step 4: Add Your Proxy
To route your traffic through a proxy (which helps you stay anonymous and avoid IP-related access denials), define a proxy configuration dictionary. Replace the placeholders with the actual values from your proxy provider. This specific section looks like this:
proxy = {
'http': 'http://:@:',
'https': 'http://:@:'
}()
Here is the example with fake credentials:
proxy = {
‘http’: ‘http://user123:[email protected]:8000’,
‘https’: ‘http://user123:[email protected]:8000’
}

In this tutorial, we’re using the DataImpulse proxy. Log in to your dashboard, and there you’ll find all the necessary credentials. You can also just copy the right details under the section Basic URL example.

- Step 5: Make a Request Using the Proxy
Now that you’ve created your CloudScraper instance and set up your proxy, it’s time to make a real request.
Here’s the code:
response = scraper.get('https://httpbin.io/ip', proxies=proxy)
print(response.text)()
In this code, we use https://httpbin.io/ip. It is a test endpoint. What does it mean? It returns the IP address from which your request is coming. If it doesn’t work, you can try http://ip-api.com/json.

- Step 6: Full Script: Integrate Proxy
Here’s a clean, complete version of the script using CloudScraper with a proxy, ready to copy and run:
import cloudscraper
# create CloudScraper instance
scraper = cloudscraper.create_scraper()
# define your proxy
proxy = {
'http': 'http://:@:',
'https': 'http://:@:'
}
# make a request using the proxy
response = scraper.get('https://httpbin.io/ip', proxies=proxy)
print(response.text)()
On your computer, it looks like this:

And the result in the Terminal section will look like this:

That JSON response confirms your proxy is active. The request went through the proxy, helping mask your real IP — exactly what we want for anonymity.
If the case is successful, you’ll see the IP of your proxy, not your real IP. To check your real IP address without coding, you can simply visit one of these websites in your browser:
https://whatismyipaddress.com
https://ipinfo.io
https://ifconfig.me
For example, here is the IP of the proxy we use, not our real one:

How to Operate in Line with Cloudflare & Anti-Bot Pages Policies
Many websites are protected by services like Cloudflare to block bots and protect against spam or abuse. These systems detect unusual traffic and browser inconsistencies. Normally, these protections show you JavaScript-based challenges or CAPTCHA pages. CloudScraper is built specifically to mimic browser behavior and solve most of these challenges automatically.
You have to complete all the previous steps we mentioned. Import CloudScraper, create a CloudScraper instance, and add your proxy. Next, you’ll make a request to a protected website. Here’s how to use it in your script:
url = 'https://www.example-protected-site.com'
response = scraper.get(url, proxies=proxy)
print(response.status_code)
print(response.text[:500])()
The full script:
import cloudscraper
# Create a CloudScraper instance (mimics browser behavior)
scraper = cloudscraper.create_scraper()
# Set up your proxy
proxy = {
'http': 'http://:@:',
'https': 'http://:@:'
}
# Target a Cloudflare-protected website (example below: change as needed)
url = 'https://www.example-protected-site.com'
# Send the request through the proxy
response = scraper.get(url, proxies=proxy)
# Output the response
print(response.status_code)
print(response.text[:500]) # print only the first 500 characters()
In your Terminal, you’ll get the response. That means your request dealt with Cloudflare’s initial JavaScript challenge, and the server responded with a script designed to handle geolocation and localization logic on the client side.
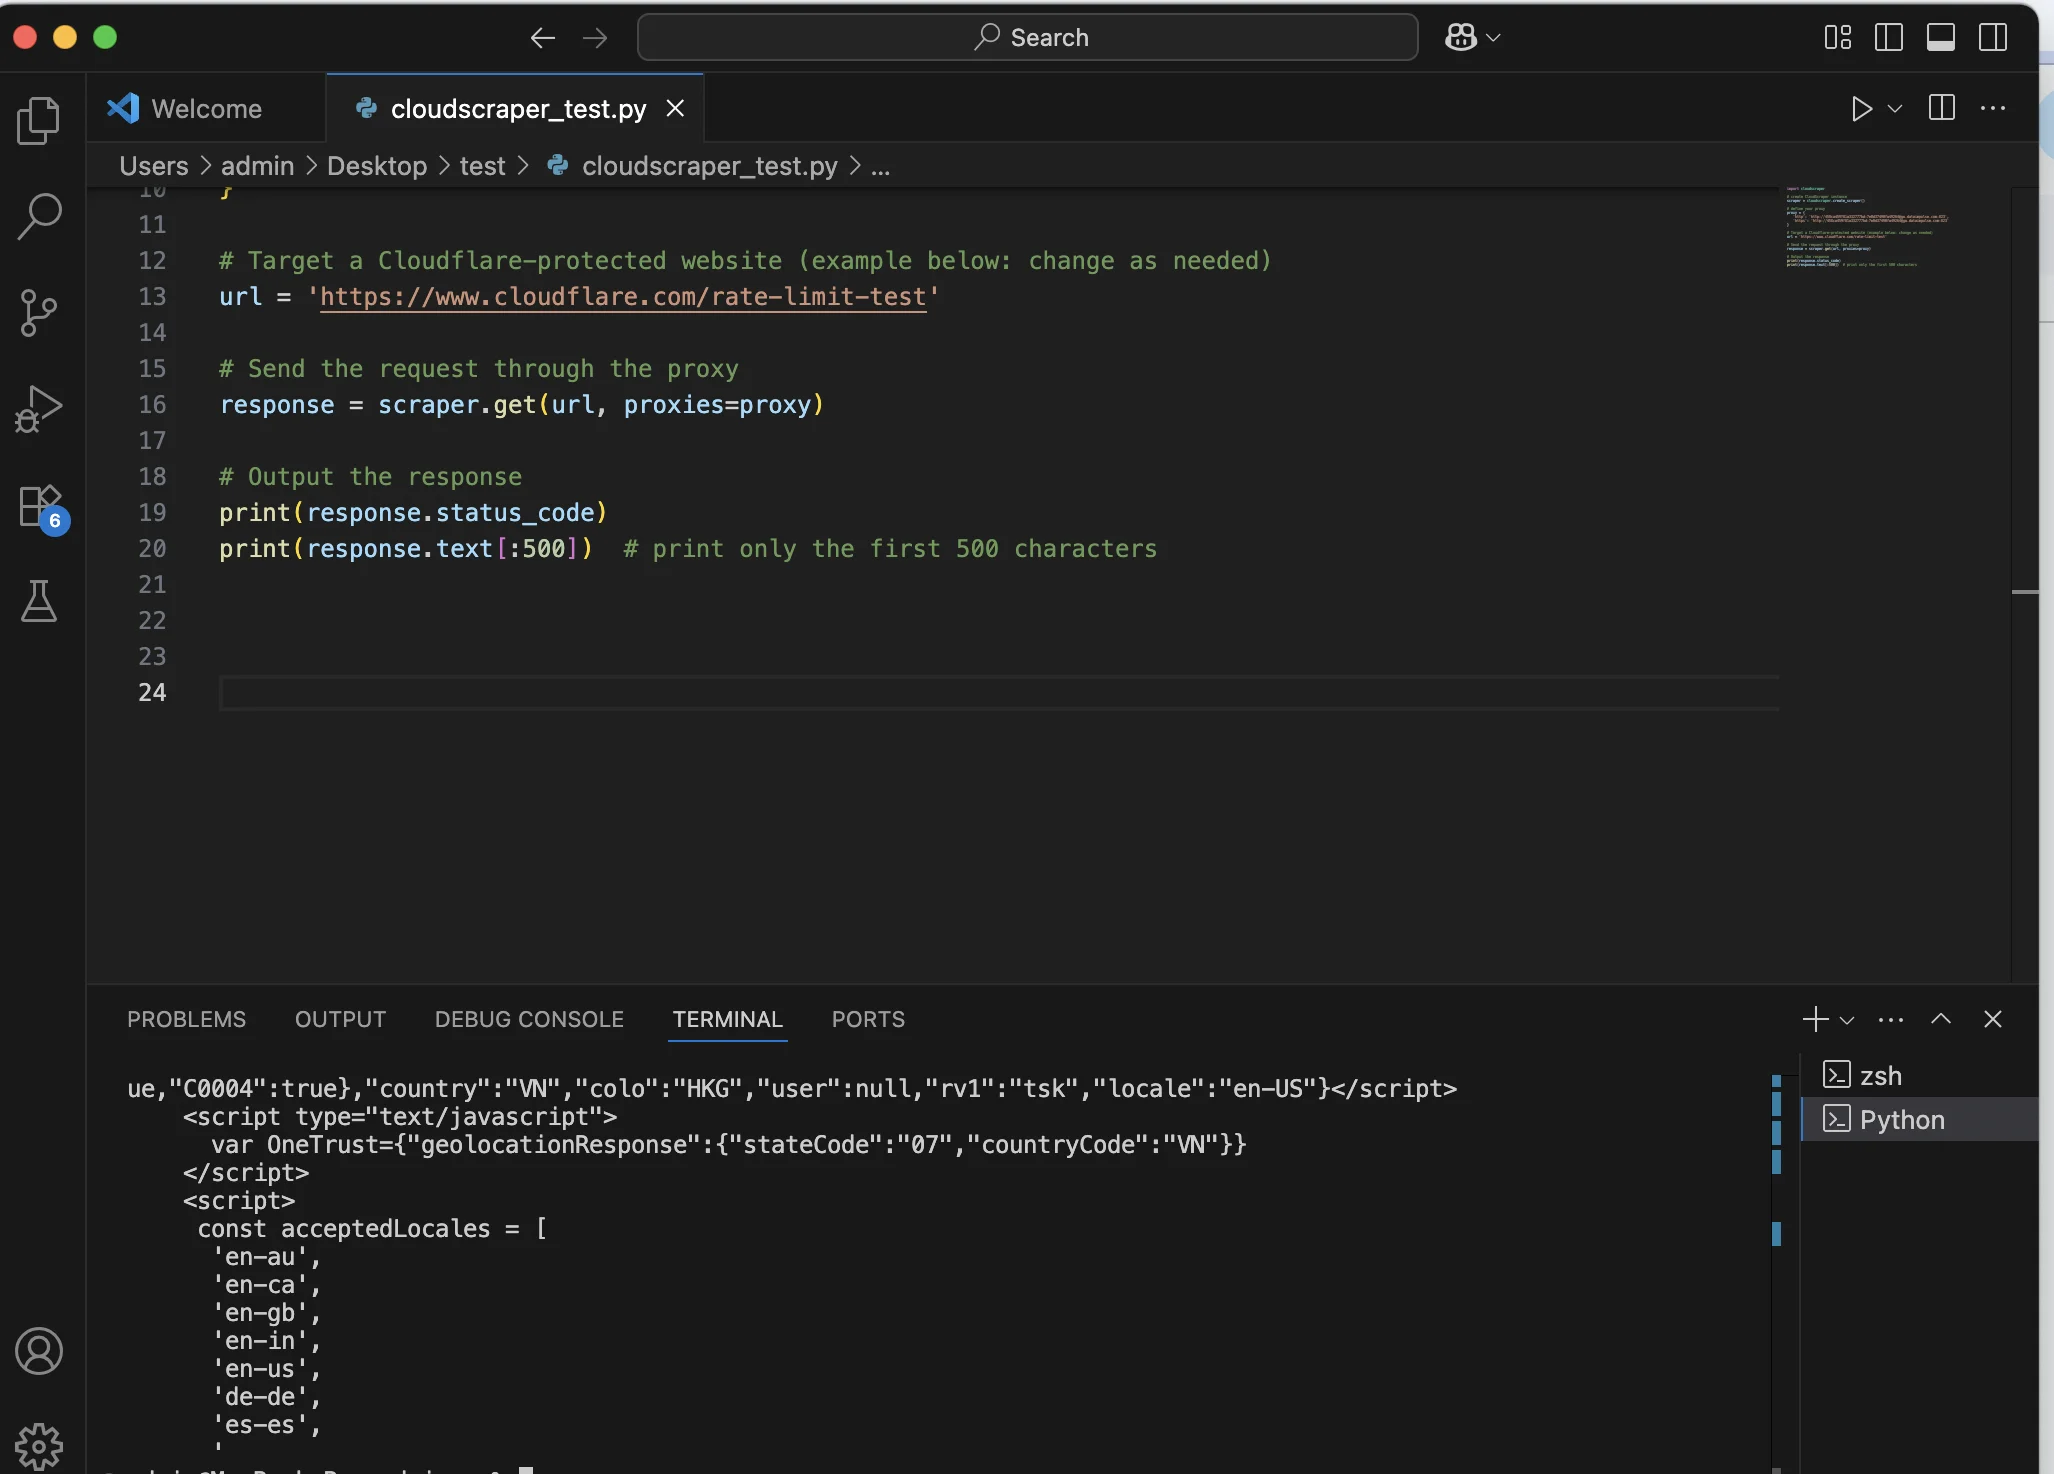
The geolocation (“countryCode”:”VN”) reflects the IP address used by your proxy, in this case, Vietnam. The server didn’t block your request, so you can continue scraping unless the page requires JavaScript to fully load the data. That’s it.
Conclusion
CloudScraper is a great solution for navigating modern web protections, including those enforced by Cloudflare. It balances effectiveness and invisibility, emulating authentic browser behavior while maintaining a lightweight footprint. Combine this tool with a high-quality proxy, and you’ll easily perform data extraction, monitor your content, or automate tasks.
Remember to scrape responsibly and respect each website’s rules and legal boundaries.
Related Articles:
Scraping Amazon product data with Python
Handle verification challenges in web scraping using Python and Selenium

 State/City/Zip/ASN Targeting


